jueves, 16 de diciembre de 2010

Running Symfony 1.4 with MS SQL Server 2008

I have used Symfony with Oracle and MySQL and was very happy that I could switch seamlessly from one RBDMS to another. When I had to switch to SQL Server 2008 I thought it would be pretty much the same thing. Well… I was wrong.
I found very little on Symfony and SQL Server on the world library (Google). I got bits and pieces that gave me an idea of what was wrong.

Issues

1. It seems Doctrine 1.2.x doesn´t support the new Microsoft Driver and PHP 5.3 doesn´t support the mssql driver any more. You have two choices connecting via ODBC to SQL Server and keep PHP 5.3 or switch to PHP 5.2 and use mssql driver.
2. I haven´t been able to run the doctrine:build task with existing tables.
3. Cannot use comment on the schema.yml
4. Problems using UTF-8 encoding on data. The data loaded from the fixtures.yml is encoded incorrectly when loaded to the database. This is because the fixtures.yml is encoded in UTF-8 and the database is expecting cp1252. The work around is switch the fixtures.yml encoding to cp1252.

The sfexample Project

I created a Symfony project to test the behavior of MS SQL Server 2008 with the ODBC driver and the mssql driver.
I´m using MS SQL Server 2008 Express R2 and WAMP 2.0i
I created a simple clients table. My schema.yml:
client:
tableName: clients
columns:
id:
type: integer(4)
primary: true
autoincrement: true
firstname:
type: string(30)
lastname:
type: string(40)
country:
type: string(40)

My fixtures are:
client:
vj:
firstname: Víctor
lastname: Asunción
country: Panamá
bc:
firstname: Benjamón
lastname: Coclé
country: Panamá

Symnfony 1.4, PHP 5.3.0 and ODBC

To use the PDO ODBC driver you need to:
1. Uncomment the extension on your php.ini. If you´re using WAMP be sure to edit the php.ini that Apache uses and the one that is in your php home directory.
extension=php_pdo_odbc.dll
2. If you´re using Netbeans make sure you´re using PHP 5.3.0. Go to Tool\Options, click on the PHP icon and verify in that PHP 5 Interpreter is pointing to the PHP 5.3 executable (in my case C:\wamp\bin\php\php5.3.0\php.exe)
3. Edit the Path environment variable to point to the PHP 5.3.0 home directory (in my case C:\wamp\bin\php\php5.3.0).
Change the databases.yml to look like this:
all:
doctrine:
class: sfDoctrineDatabase
param:
dsn: odbc:DRIVER={SQL Server};Server=MYMACHINE\SQLEXPRESS;Database=sfexample;dbname=sfexample;
username: sa
password: mypassword

Run
symfony doctrine:build --all --no-confirmation --and-load
The first time I ran it works. It creates the tables and loads the data. If I run it a second time I get this error:
SQLSTATE[25000]: Invalid transaction state: 3902 [Microsoft][ODBC SQL Server Driver][SQL Server]The COMMIT TRANSACTION request has no corresponding BEGIN TRANSACTION. (SQLExecDirect[3902] at ext\pdo_odbc\odbc_driver.c:247)
The work around to it is manually delete the table. This is an inconvenience to say the least. If you have many tables with relations it can become a hassle.
I you take a look at my fixtures you´ll notice I use accented vowels. Since SQL Server doesn´t understand UTF-8 when I run a select from the clients table I get this


The collation for my database is Modern_Spanish_CI_AS. The work around I found was saving the fixtures.yml in cp1252 encoding. The problem with this, is that Netbeans assigns a single encoding for the whole project. So I decided to keep all my project in UTF-8 and edit the fixtures.yml externally (outside Netbeans).
I created a doctrine module for clients.
symfony doctrine:generate-module frontend clients Client

When I try t save a record I get a warning like this (with the whole call stack):
Deprecated: Function spliti() is deprecated in C:\symfony-1.4.8\lib\plugins\sfDoctrinePlugin\lib\vendor\doctrine\Doctrine\Connection\Mssql.php on line 192


It seems the spliti() function has been deprecated in PHP 5.3 and PHP decided to “share” it with us. To solve this go to the settings.yml and change the error reporting to:
.settings:
error_reporting: <?php echo E_ALL & ~E_DEPRECATED ."\n" ?>

To avoid the encoding problem from the client module change the character set to cp1252 on the setting.yml
all:
.settings:
charset: cp1252

You have to clear the cache to make the charset take.

Symnfony 1.4, PHP 5.2.11 and mssql


To use the PDO mssql driver you need to:
1. Uncomment the mssql and pdp mssql extensions on your php.ini. If you´re using WAMP be sure to edit the php.ini that Apache uses and the one that is in your php home directory.
extension=php_mssql.dll
extension=php_pdo_mssql.dll
2. If you´re using Netbeans make sure you´re using PHP 5.2.11. Go to Tool\Options, click on the PHP icon and verify in that PHP 5 Interpreter is pointing to the PHP 5.3 executable (in my case C:\wamp\bin\php\php5.2.11\php.exe)
3. Edit the Path environment variable to point to the PHP 5.2.11 home directory (in my case C:\wamp\bin\php\php5.2.11).
Change the databases.yml to look like this:
all:
doctrine:
class: sfDoctrineDatabase
param:
dsn: mssql:host=MYMACHINE\SQLEXPRESS;dbname=sfexample
username: sa
password: mypassword

Run
symfony doctrine:build --all --no-confirmation --and-load

The mssql driver doesn´t seem to have the problem with rerunning the task that the odbc driver has.
The client module was already created.
There was no problem with the spliti function since it´s still supported in PHP 5.2.x
To avoid the encoding problem from the client module change the character set to cp1252 on the setting.yml
all:
.settings:
charset: cp1252

You have to clear the cache to make the charset take.

References


http://forums.asp.net/t/1200021.aspx

martes, 14 de diciembre de 2010

Installing Microsoft SQL Server 2008 Drivers for PHP

Installing the Microsoft Drivers for SQL Server 2008 is a not as simple as one would think. One of the things that had me confused was the fact that I had previously made a conection to SQL Server 2005 with no problem. Now, using SQL Server 2008 (Express) nothing worked.

After some research I realized the problem was tha in my previous connections I was using PHP 5.2.x which used the mssql driver. For some reason the mssql server is no longer supported for PHP 5.3 and we are supposed to use the Microsoft Driver.

Installation

Download the drivers from http://www.microsoft.com/downloads/en/details.aspx?FamilyID=80e44913-24b4-4113-8807-caae6cf2ca05&displaylang=en .

When you install you´ll need to choose which dlls to use. Use the following table to decide:

PHP Version

Web Server

Dlls

5.2

IIS

php_pdo_sqlsrv_52_nts_vc6.dll

php_sqlsrv_52_nts_vc6.dll

5.2

Apache

php_pdo_sqlsrv_52_ts_vc6.dll

php_sqlsrv_52_ts_vc6.dll

5.3

IIS with FastCGI

php_pdo_sqlsrv_53_nts_vc9.dll

php_sqlsrv_53_nts_vc9.dll

5.3

Apache as mod_php

php_pdo_sqlsrv_53_ts_vc6.dll

php_sqlsrv_53_ts_vc6.dll

5.3

Apache as FastCGI

php_pdo_sqlsrv_53_nts_vc6.dll

php_sqlsrv_53_nts_vc6.dll

Double click on SQLSRV20.EXE

Click yes.

Select your output directory and click Ok.


Click Ok.

Copy the file c:\temp\php_pdo_sqlsrv_53_ts_vc6.dll and c:\temp\php_sqlsrv_53_ts_vc6.dll to your PHP_HOME\ext folder (since I´m using WAMP my path is C:\wamp\bin\php\php5.3.0\ext)

Edit your php.ini (mine is at C:\wamp\bin\php\php5.3.0\) adding the following lines

extension=php_sqlsrv_53_ts_vc6.dll

extension=php_pdo_sqlsrv_53_ts_vc6.dll

If you´re using WAMP you have to edit the php.ini that Apache uses. Double click on php.ini add the extensions and restart Apache.


Testing Installation

Open command prompt a run

php –v

If you get an error like this one:


You´re using the wrong dlls for your php installation. Verify you´re using php_pdo_sqlsrv_53_ts_vc6.dll and php_sqlsrv_53_ts_vc6.dll

Create a directory c:\temp\sqlservertest.

In Apache create an alias for this directory with the name sqlservertest.

Create a file in c:\temp\sqlservertest with the name phpinfo.php and the following content:

<?php phpinfo(); ?>

We had already created a Table on SQL Server called users to test the driver.

Create and index.php file write the following code.


<?php
/*
* Specify the server and connection string attributes.
*/
$serverName = "MYMACHINE\SQLEXPRESS";
$uid = "username";
$pwd = "password";
$database = "sqlservertest";
try {
$conn = new PDO( "sqlsrv:server=$serverName;database=$database", $uid, $pwd);
$conn->setAttribute( PDO::ATTR_ERRMODE, PDO::ERRMODE_EXCEPTION );
$conn->setAttribute(PDO::SQLSRV_ATTR_DIRECT_QUERY , true);

echo "Connected to SQL Server<br /><br />\n";

$sql = "select * from myschema.users";
$results = $conn->query( $sql );
outputRows($results);

// Free statement and connection resources.
$stmt = null;
$conn = null;
} catch( PDOException $e ) {
echo "<h1>Error connecting to SQL Server</h1><pre>";
echo $e->getMEssage();
echo "</pre>";
exit();

}
function outputRows($results)
{
echo "<table border='1'>\n";
while ( $row = $results->fetch( PDO::FETCH_ASSOC ) ){
echo "<tr><td>{$row['id']}</td><td>{$row['firstname']}</td><td>{$row['lastname']}</td>\n";
}
echo "</table>\n";
return;
}


References

http://www.php.net/manual/en/ref.pdo-dblib.php

http://www.ditii.com/2010/11/16/sql-pdo-and-microsoft-sql-server-whitepaper-php-drivers-for-sql-server/

lunes, 6 de diciembre de 2010

Writing to a Properties File with Apache ANT

I needed to create properties file every time I made a migration in order to know who, when and from where the migration was made.
The easiest way to do this is using Apache ANT.

To gain access to the environment variables you must declare the environment property. This can be done under the project tag.
<property environment="env" />

Inside your target use the following code:

When you run the make-properties target if will generate a file named build.properties with something like this:
<target name="make-properties " >
<propertyfile file="build.properties" comment="A comment to appear in the properties file.">
<entry key="program.BUILDDATE" type="date" value="now" pattern="yyyyMMdd-HHmmss" />
<entry key="program.BUILDHOST" value="${env.COMPUTERNAME}" />
<entry key="program.BUILDUSER" value="${user.name}" />
</propertyfile>
</target>

When you run the make-properties target if will generate a file named build.properties with something like this:
# A comment to appear  in the properties file.
#Wed, 01 Dec 2010 11:45:24 -0500
program.BUILDDATE=20101201-114524
program.BUILDHOST=GISHOST
program.BUILDUSER=LBerrocal

domingo, 5 de diciembre de 2010

Using jQuery UI DatePicker in Symfony

The easiest way to use to use the jQuery UI datepicker is to install the sfFormExtraPlugin.

symfony install:plugin sfFormExtraPlugin

Getting the Libraries

You have to download the jquery library and the jquery-ui library, actually I found out that the jQuery UI zip includes the jQuery library. Since I'm developing in spanish I require the i18n javascript for jQuery UI. I couln't find it on the jQuery UI site (but I didn't look very hard). I found the script at http://ajax.googleapis.com/ajax/libs/jqueryui/1.8.6/i18n/jquery-ui-i18n.min.js. My project doesn't have access to the Internet so I copied and pasted the code into /web/js/jquery-ui-i18n.min.js.

You need to copy your jquery-1.4.2.min.js, jquery-ui-1.8.6.custom.js and jquery-ui-i18n.js to the /web/js directory (the versions for the libraries will change depending on when you read this post). On your jQuery UI zip there is a css folder inside it you'll find folder with the theme you selected in my case its a folder named smoothness copy this folder to /web/css folder.

Declaring the Libraries and CSS in Symfony

In the /apps/myapplication/config/view.yml make change to declare the javascripts and css files.

  stylesheets:    [main.css, smoothness/jquery-ui-1.8.custom.css]

javascripts: [jquery-1.4.2.min.js, jquery-ui-1.8.custom.min.js, jquery-ui-i18n.min.js]

Editing the the Form Class

Edit your form class /form/doctrine/myclassForm.class.php and change the date widget to sfWidgetFormJQueryDate it should look something like this:

public function configure() {
$current_user = sfContext::getInstance()->getUser();
$culture = substr($current_user->getCulture(), 0,2);
$this->widgetSchema['requestDate'] = new sfWidgetFormJQueryDate(array(
'image'=>'/images/calendar.gif',
'config' => '{}',
'culture' => $culture
));
}

The image is to have custom button, config is javascripts configuration data (I don't know what this does), culture is to have the date picker in your language. I originally tried to to pass the users culture to the culture option. My culture is es_PA (spanish Panama) and when I passed it to the culture option it showed the days and months in what I believe is Mandarin. I realized that what the widget recognizes as culture is actually just the language so I used the substr function to extract the first two letters from the culture.

Now publish the assets running the following command:

symfony plugin:publish-assets

Now you're ready to display a a datepicker besides you're date variable in the form.

You still get the comboboxes for days, months and years and beside it you get a button that will display a calendar and let you select date. I'm working on getting a read only input textbox besides the calendar button instead of the comboboxes.

Enjoy!!!

martes, 30 de noviembre de 2010

Another Simple jQuery Plugin

Though it seem there is a jQuery plugin for every thing. I wanted to write my own to understand how plugins work.

While using Symfony I use jQuery to have master checkbox to select/deselect all the checkboxex in a table and add a class to the row depending on whether the row was even or odd.

The code in my indexSuccess.php looke like this

<script type="text/javascript">
$('input#masterCheck').click(function(){
var chks = $('td input[name^=ids]');
if($(this).is(':checked')){
chks.attr('checked', true)
}else{
chks.attr('checked', false)
}
}
);
$('tbody tr:even').addClass('even');
$('tbody tr:odd').addClass('odd');
</script>

There was nothing wrong with this code. But it had to be repeated in every single module. I wanted something a little more flexible so I went on and "pluginized" it.

Add a new javascript file named web/js/jquery-formattable.js (this path is for Symfony users, if you're not using Symfony you can put anywhere it's accessible) and type the following code:

jQuery.fn.formatTable = function(options){
settings = $.extend({
checkControlId : 'masterCheck',
childrenCheckSelector: 'input[name^=ids]'
}, options);
jQuery('input#' + settings.checkControlId, this).click(function(){
var chks = jQuery('td ' + settings.childrenCheckSelector);
if(jQuery(this).is(':checked')){
chks.attr('checked', true)
}else{
chks.attr('checked', false)
}
}
);
jQuery('tbody tr:even', this).addClass('even');
jQuery('tbody tr:odd', this).addClass('odd');
};

As you can see it is pretty much the same code except we declared a function formatTable and added some two default settings:

  • checkControlId: Is the id for the master checkbox control. The one when clicked will chech/uncheck the rest of the checkboxes in the table.
  • childrenCheckSelector: Is the CSS selector to find the checkboxes to change.

Now all you have to do is replace the first set of code with :

<script type="text/javascript">

$('table.datalist').formatTable();

</script>

Voilá!! It works!

lunes, 29 de noviembre de 2010

Implementing Ajax Pagination with Symfony

I wanted to use ajax to update the list generated in the indexSucces.php of a module.
After some research I found to great posts:
  1. jQuery DataTables and Symfony This post uses jQuery and Datatables to update a list. I took a look at the jQuery plugin Datatables and it looks great. But since I'm including actions in my tables and didn't know how to implement them on Datatables I went and look for something a bit more simple.
  2. Symfony Tips & Tricks IV: Generalized & Ajax Pagination This post extends the sfDoctrinePager to generate the pagination navigation. I'm unclear why to extend the sfDoctrinePager to do this, but since I'm new to Symfony I won't question the authors approach. What I did did was implement his pagination with jQuery but I included the sorting too.
  3. Symfony: How to render a partial from an action: What I was missing was a way to render the data in simple way without messing with JSON and building the tables with jQuery (wich is what Datatables does).
On a previous post Using Pagination with Symfony and Doctrine I blogged about pagination. So I decided to extend that example.

Creating an Ajax Pagination Control

Create a file named /myproject/apps/myapplication/templates/_ajax_pagination_control.php and copy the following code on it. Then save it.
<div class="pagination">
<a href="#" onclick="loadPage(1);">
<?php echo image_tag('/images/first.png', array('alt' => __('First page', array(), 'sf_admin'), 'title' => __('First page', array(), 'sf_admin'))) ?>
</a>
<a href="#" onclick="loadPage(<?php echo $pager->getPreviousPage() ?>);">
<?php echo image_tag('/images/previous.png', array('alt' => __('Previous page', array(), 'sf_admin'), 'title' => __('Previous page', array(), 'sf_admin'))) ?>
</a>

<?php foreach ($pager->getLinks() as $page): ?>
<?php if ($page == $pager->getPage()): ?>
<?php echo $page ?>
<?php else: ?>
<a href="#" onclick="loadPage(<?php echo $page ?>);"><?php echo $page ?></a>
<?php endif; ?>
<?php endforeach; ?>
<a href="#" onclick="loadPage(<?php echo $pager->getNextPage() ?>);">
<?php echo image_tag('/images/next.png', array('alt' => __('Next page', array(), 'sf_admin'), 'title' => __('Next page', array(), 'sf_admin'))) ?>
</a>
<a href="#" onclick="loadPage(<?php echo $pager->getLastPage() ?>);">
<?php echo image_tag('/images/last.png', array('alt' => __('Last page', array(), 'sf_admin'), 'title' => __('Last page', array(), 'sf_admin'))) ?>
</a>
</div>

Editing the Action


Open your actions.php file and change it to look like this:
   public function executeIndex(sfWebRequest $request) {
if ($request->getParameter('sort') && $this->isValidSortColumn(
$request->getParameter('sort'))) {
$this->setSort(array($request->getParameter('sort'),
$request->getParameter('sort_type')));
}

$items_x_page = sfConfig::get('app_max_items_x_page');
$this->pager = $this->getPager($request);
$this->sort = $this->getSort();
}

protected function getPager(sfWebRequest $request){
$items_x_page = sfConfig::get('app_max_items_x_page');
$pager = new sfDoctrinePager('RepairRequest', $items_x_page); // Table, items per page
$pager->setQuery($this->buildQuery());
$pager->setPage($request->getParameter('page', 1)); // actual page
$pager->init();
return $pager;
}
public function executeGetList(sfWebRequest $request) {
$pager = $this->getPager($request);
$sort = $this->getSort();
return $this->renderPartial('repairrequest/list',
array('pager' => $pager, 'sort' => $sort));
}
On line 15 change RepairRequest for your object and on line 24 change the partials path to yours.

Creating the List Partial


Create /myproject/apps/myapplication/modules/mymodule/templates/_list.php file with a code that looks like the following. You will have to adjust for your project.
<?php use_helper('I18N') ?>
<div id="loading"></div>
<table class="datalist">
<thead>
<tr>
<th><input type="checkbox" id="masterCheck"name="master" value="bar" /> </th>
<th>
<?php include_partial('global/sortable_header', array('fieldname' => 'id',
'fieldlabel' => 'Id', 'routename' => '@repairrequest', 'sort' => $sort)) ?>
</th>
<th>
<?php include_partial('global/sortable_header', array('fieldname' => 'requestDate',
'fieldlabel' => 'Request Date', 'routename' => '@repairrequest', 'sort' => $sort)) ?>
</th>
<th>
<?php include_partial('global/sortable_header', array('fieldname' => 'location',
'fieldlabel' => 'Location', 'routename' => '@repairrequest', 'sort' => $sort)) ?>
</th>
<th><?php echo __('Description', array(), 'messages') ?></th>
<th>
<?php include_partial('global/sortable_header', array('fieldname' => 'rt.name',
'fieldlabel' => 'Repair Type', 'routename' => '@repairrequest', 'sort' => $sort)) ?>
</th>
<th>
<?php include_partial('global/sortable_header', array('fieldname' => 'repair_status_id',
'fieldlabel' => 'Repair Status', 'routename' => '@repairrequest', 'sort' => $sort)) ?>
</th>
<th>
<?php include_partial('global/sortable_header', array('fieldname' => 'real_state_id',
'fieldlabel' => 'Real State', 'routename' => '@repairrequest', 'sort' => $sort)) ?>
</th>
<th><?php echo __('Updated at', array(), 'messages') ?></th>
<th><?php echo __('Actions', array(), 'messages') ?></th>
</tr>
</thead>
<tbody>
<?php foreach ($pager->getResults() as $i => $repair_request): ?>
<tr>
<td><?php include_partial('global/list_td_batch_actions', array('obj' => $repair_request)) ?></td>
<td><a href="<?php echo url_for('repairrequest/show?id=' . $repair_request->getId()) ?>">
<?php echo $repair_request->getId() ?></a></td>
<td><?php echo format_date($repair_request->getRequestDate(),
sfConfig::get('app_string_date_format')) ?>
</td>
<td><?php echo $repair_request->getLocation() ?></td>
<td><?php echo $repair_request->getDescription() ?></td>
<td><?php echo $repair_request->getRepairType() ?></td>
<td><?php echo $repair_request->getRepairStatus() ?></td>
<td><?php echo $repair_request->getRealState() ?></td>
<td class="long_date"><?php echo format_date($repair_request->getUpdatedAt(),
sfConfig::get('app_string_datetime_format')) ?></td>
<td>
<?php include_partial('global/list_td_actions', array('module'
=> 'repairrequest', 'obj' => $repair_request)) ?>
</td>
</tr>
<?php endforeach; ?>
</tbody>
<tfoot>
<tr><td colspan="10">

<?php include_partial('global/page_numbers', array('pager' => $pager)) ?>
<?php include_partial('global/ajax_pagination_control', array('pager' => $pager, 'module' => 'repairrequest')) ?>
</td></tr>
</tfoot>
</table>
<script type="text/javascript">
$('input#masterCheck').click(function(){
var chks = $('td input[name^=ids]');
if($(this).is(':checked')){
chks.attr('checked', true)
}else{
chks.attr('checked', false)
}
}
);
$('tbody tr:even').addClass('even');
$('tbody tr:odd').addClass('odd');
</script>
This partial will be rendered by the ajax call to getList.
Open your /myproject/apps/myapplication/modules/mymodule/templates/indexSuccess.php .
<?php use_helper('I18N') ?>
<h1>Repair requests List</h1>
<form action="<?php echo url_for('repairrequest/batch') ?>" method="post">

<div id="data">
<?php include_partial('list', array('pager' => $pager, 'sort' => $sort)) ?>
</div>
<a href="<?php echo url_for('repairrequest/new') ?>">New</a>
<?php include_partial('list_batch_actions', array()) ?>
</form>

<script type="text/javascript">
// as we have the <div id="data"> we'll completely reload it's contents
var container = jQuery("#data");
$('#loading').hide();
// note that you'll need a routing for the offers index to point to module: offers, action: index..
var url = "<?php echo url_for("repairrequest/getList"); ?>";

function loadPage(page)
{
$.ajax({
url: url+"?page="+page,
type: 'POST',
dataType: 'html',
timeout: 4000,
beforeSend: function(){
$('#loading').show();
},
complete: function(){
$('#loading').hide();
},
error: function(xhr, textStatus, errorThrown){
msg = "Error " + errorThrown;
alert(msg);
},
success: function(data){
container.html(data);
}
});
}
</script>

Editing the CSS


To get a gif to show while the data is uploading you'll need an animated gif. You can create one online athttp://www.ajaxload.info/.
open your main.css file and add the following code:
#loading{
background: url(../images/ajax-loader_2.gif) no-repeat center;
position: relative;
top: 50%;
left: 50%;
height: 40px;
width: 40px
}

domingo, 21 de noviembre de 2010

Extracting modified files from a Subversion Project

Sometimes you work on a project but don´t want to commit the changes but also want to take the changes with you to another computer.
Here´s a little trick for linux and Mac. On a terminal move to your versioned project directory and type
svn status | grep ^[AM\?] | awk  '{print $2}' | zip ../backup_`date +"%Y%m%d_%H%M"` -@

This will zip all added (A), modified (M) and new (?) files to a file named backup_20101117.zip with the directory structure
To unzip it:
tar xvf /path/to/zip/backup_20101117.zip -C /path/to/project

If you´re using Windows…. Be afraid, be very afraid. Nah just kidding you can install Cygwin (http://www.cygwin.com ) and use this trick.

jueves, 11 de noviembre de 2010

Using Flash Messages in Symfony

Symfony has a very cool way to handle states. The traditional way would be to declare a variables in the session and then eliminate it. With flash messages you create them a they are dropped in the next request.
When you generate a module using the doctrine:generate-module task you don't get any message telling you the result of your saves.
We're going to show you how to add a message after a record was successfully saved.

Creating a Partial

First create a globlal partial at myproject/apps/myapplication/templates/_flahes.php with the following code:
<?php if ($sf_user->hasFlash('notice')): ?>
<div class="notice"><?php echo __($sf_user->getFlash('notice'),
array(), 'sf_admin') ?></div>
<?php endif; ?>

<?php if ($sf_user->hasFlash('error')): ?>
<div class="error"><?php echo __($sf_user->getFlash('error'),
array(), 'sf_admin') ?></div>
<?php endif; ?>

Editing the _form.php Partial

Open your myproject/apps/myapplication/modules/mymodule/templates/_form.php and add the partial and the i18n helper.
<?php use_helper('I18N') ?>
<?php use_stylesheets_for_form($form) ?>
<?php use_javascripts_for_form($form) ?>
<?php include_partial('global/flashes') ?>

Add the Flash Message in the Action

Open your myproject/apps/myapplication/modules/mymodule/actions/actions.class.php, find the processForm function and add the flash message as shown:

protected function processForm(sfWebRequest $request, sfForm $form) {
$form->bind($request->getParameter($form->getName()),
$request->getFiles($form->getName()));
if ($form->isValid()) {
$repair_request = $form->save();
$this->getUser()->setFlash('notice', 'The item was updated successfully.');
$this->redirect('repairrequest/edit?id=' . $repair_request->getId());
}
}

Styling the Message

Lets style the message open your main.css file and add the following:
.notice{
font: 11px/24px Verdana, Arial, Helvetica, sans-serif;
background: url(../images/ok.png) no-repeat 4px 4px;
margin: 0px 0px 0px 35px;
padding-left: 23px
}
You'll need an ok.png file to use as an icon.

lunes, 8 de noviembre de 2010

Sorting Lists in Symfony

On my previous post Using Pagination with Symfony and Doctrine I discussed how to implement pagination based what the admin generator created.

With sorting I did pretty much the same, looked around the cache to see what the generator did.

Creating the sortable_header Partial


Create a file named /myproject/apps/myapplication/templates/_sortable_header.php and copy the following code on it. Then save it.

<?php if ($fieldname == $sort[0]): ?>
<?php echo link_to(__($fieldlabel, array(), 'messages'), $routename,
array('query_string' => 'sort='. $fieldname .'&sort_type=' .
($sort[1] == 'asc' ? 'desc' : 'asc'))) ?>
<?php echo image_tag('/images/' .
$sort[1] . '.png', array('alt' => __($sort[1], array(), 'sf_admin'),
'title' => __($sort[1], array(), 'sf_admin'))) ?>
<?php else: ?>
<?php echo link_to(__($fieldlabel, array(), 'messages'), $routename,
array('query_string' => 'sort='. $fieldname .'&sort_type=asc')) ?>
<?php endif; ?>


This template receives 3 variables:
$fieldname: The name of the field as defined in the Object class.
$fieldlabel: The text you want to display in the header. It implements i18n so if your translate your site it will work.
$routename: Name of the route to generate the link.

You'll need to have the asc.png and desc.png on your /myproject/web/images directory in order to get the arrows.

Editing indexSuccess.php


Open your /myproject/apps/myapplication/modules/mymodule/templates/indexSuccess.php
Your column headers should look something like this:

<thead>
<tr>
<th>Id</th>
<th>Request date</th>
<th>Location</th>
<th>Description</th>
<th>Repair type</th>
<th>Repair status</th>
<th>Real state</th>
<th>Updated at</th>
<th>Updated by</th>
</tr>
</thead>

Choose which headers you want to be sortable. Your code should look something like this:
  <thead>
<tr>
<th>
<?php include_partial('global/sortable_header', array('fieldname'
=> 'id',
'fieldlabel' => 'Id' ,'routename' => '@repairrequest', 'sort'
=> $sort)) ?>
</th>
<th>
<?php include_partial('global/sortable_header', array('fieldname'
=> 'requestDate',
'fieldlabel' => 'Request Date' ,'routename' => '@repairrequest', 'sort' => $sort)) ?>
</th>
<th>
<?php include_partial('global/sortable_header', array('fieldname'
=> 'location',
'fieldlabel' => 'Location' ,'routename' => '@repairrequest', 'sort'
=> $sort)) ?>
</th>
<th>Description</th>
<th>
<?php include_partial('global/sortable_header', array('fieldname' => 'repair_type_id',
'fieldlabel' => 'Repair Type' ,'routename' => '@repairrequest', 'sort'
=> $sort)) ?>
</th>
<th>
<?php include_partial('global/sortable_header', array('fieldname'
=> 'repair_status_id',
'fieldlabel' => 'Repair Status' ,'routename' => '@repairrequest', 'sort' => $sort)) ?>
</th>
<th>
<?php include_partial('global/sortable_header', array('fieldname'
=> 'real_state_id',
'fieldlabel' => 'Real State' ,'routename' => '@repairrequest', 'sort'
=> $sort)) ?>
</th>
<th>Updated at</th>
<th>Updated by</th>
</tr>
</thead>


But there is a problem with this logic. For columns that are foreign keys it will only sort by the id. For example RepairRequest has a one to many relation with RepairType, so i can sort by foreign keys only, thats why I uses as $fieldname repair_request_id. What we actually want is to sort by the name of the RepairType.
I think I can fix this with a custom query on the action. I'll post the fix when I find it.
For now enjoy!!

domingo, 7 de noviembre de 2010

Using Pagination with Symfony and Doctrine

In order to understand how the Doctrine pager works, I created a admin module with the admin generator task and started snooping around the cache to see what it generated.

This is how I figured it out, may no be pretty but it works.

Create a Pagination Control


Create a file named /myproject/apps/myapplication/templates/_pagination_control.php and copy the following code on it. Then save it.

<div class="pagination">
<a href="<?php echo url_for($module) ?>?page=1">
<?php echo image_tag('/images/first.png', array('alt' =>
__('First page', array(), 'sf_admin'), 'title' =>
__('First page', array(), 'sf_admin'))) ?>
</a>

<a href="<?php echo url_for($module) ?>?page=
<?php echo $pager->getPreviousPage() ?>">
<?php echo image_tag('/images/previous.png', array('alt' =>
__('Previous page', array(), 'sf_admin'), 'title' =>
__('Previous page', array(), 'sf_admin'))) ?>
</a>

<?php foreach ($pager->getLinks() as $page): ?>
<?php if ($page == $pager->getPage()): ?>
<?php echo $page ?>
<?php else: ?>
<a href="<?php echo url_for($module) ?>?page=
<?php echo $page ?>"><?php echo $page ?></a>
<?php endif; ?>
<?php endforeach; ?>

<a href="<?php echo url_for($module) ?>?page=
<?php echo $pager->getNextPage() ?>">
<?php echo image_tag('/images/next.png', array('alt' =>
__('Next page', array(), 'sf_admin'), 'title' =>
__('Next page', array(), 'sf_admin'))) ?>
</a>

<a href="<?php echo url_for($module) ?>?page=
<?php echo $pager->getLastPage() ?>">
<?php echo image_tag('/images/last.png', array('alt' =>
__('Last page', array(), 'sf_admin'), 'title' =>
__('Last page', array(), 'sf_admin'))) ?>
</a>
</div>

You'll need to have the last.png, first.png, next.png and previous.png on your /myproject/web/images directory in order to get the pretty arrows. You can get the png files from any source you like, I extracted them from the my symonfy installation /symfony_installation/data/web/sf/sf_admin/images.

Editing the Action


Open your /myproject/apps/myapplication/config/app.yml and add the variable max_items_x_page:
all:
max_items_x_page: 5

Open your action file in my case the module is named repairrequest and the class is RepairRequest.
On the executeIndex function change the code to:
public function executeIndex(sfWebRequest $request) {
if ($request->getParameter('sort') && $this->isValidSortColumn(
$request->getParameter('sort'))) {
$this->setSort(array($request->getParameter('sort'),
$request->getParameter('sort_type')));
}

$items_x_page = sfConfig::get('app_max_items_x_page');
$this->pager = new sfDoctrinePager('RepairRequest', $items_x_page);
$this->pager->setQuery($this->buildQuery());
$this->pager->setPage($request->getParameter('page', 1));
$this->pager->init();
$this->sort = $this->getSort();
}

Change RepairRequest for your class.

Insert the following code at the end of your Action class:
//******************************************************************************************
//********************** ROUTINES FOR PAGING AND SORTING ***********************************
//******************************************************************************************
protected function buildQuery() {
$et = Doctrine_Core::getTable('RepairRequest');

$query = $et->createQuery();

$this->addSortQuery($query);

return $query;
}

protected function addSortQuery($query) {
if (array(null, null) == ($sort = $this->getSort())) {
return;
}

if (!in_array(strtolower($sort[1]), array('asc', 'desc'))) {
$sort[1] = 'asc';
}
$query->addOrderBy($sort[0] . ' ' . $sort[1]);
}

protected function getSort() {
if (null !== $sort = $this->getUser()->getAttribute('repairrequest.sort',
null, 'admin_module')) {
return $sort;
}

$this->setSort(array(null, null));

return $this->getUser()->getAttribute('repairrequest.sort', null,
'admin_module');
}

protected function setSort(array $sort) {
if (null !== $sort[0] && null === $sort[1]) {
$sort[1] = 'asc';
}
$this->getUser()->setAttribute('repairrequest.sort', $sort, 'admin_module');
}

protected function isValidSortColumn($column) {
return Doctrine::getTable('RepairRequest')->hasColumn($column);
}


Replace RepairRequest for your class name and repairrequest.sort for yourmodulename.sort.

Editing the Template


Open your /myproject/apps/myapplication/modules/mymodule/templates/indexSuccess.php at the top of the page ad the helper
for i18n.
<?php use_helper('I18N') ?>


The following code will change depending on your class
<tbody>
<?php foreach ($pager->getResults() as $i => $repair_request): ?>
<tr>
<td><a href="<?php echo url_for('repairrequest/show?id='.$repair_request->getId()) ?>">
<?php echo $repair_request->getId() ?></a></td>
<td><?php echo $repair_request->getRequestDate() ?></td>
<td><?php echo $repair_request->getLocation() ?></td>
<td><?php echo $repair_request->getDescription() ?></td>
<td><?php echo $repair_request->getRepairType() ?></td>
<td><?php echo $repair_request->getRepairStatus() ?></td>
<td><?php echo $repair_request->getRealStateId() ?></td>
<td><?php echo $repair_request->getUpdatedAt() ?></td>
<td><?php echo $repair_request->getUpdatedByFk()->getUsername() ?></td>
</tr>
<?php endforeach; ?>
</tbody>

What your doing is using the pager instead of the full cursor your get by default.
Next insert the pagination code.
<?php include_partial('global/pagination_control', array('pager' => $pager, 'module' => 'repairrequest')) ?>
<a href="<?php echo url_for('repairrequest/new') ?>">New</a>

Save it.
Now your pagination should work. On a next post I'll show how to do the sorting.
After I ran the code i got a message as if the route repairrequest did not exist (and it did). I fixed it editing the routing.yml (but I'm not really sure why I had to, just hacked it). I added the following code at the top of the routing.yml:
repairrequest:
class: sfDoctrineRouteCollection
options:
model: RepairRequest
module: repairrequest
prefix_path: /repairrequest
column: id
with_wildcard_routes: true

jueves, 4 de noviembre de 2010

Creating Random Data for Fixtures

A couple a days a go I heard a sales man raving about the capabilities of Toad (a Quest Software software) of populating tables with random data. The problem I saw with this feature is that it filled the table with incomprehensible gibberish.

Symonfy allows you to load data to your tables, but to create random data you need to rely a little on php.
Lets use a basic client table like this one (on config/doctrine/schema.yml):

Client:
columns:
id:
type: integer(4)
primary: true
autoincrement: true
firstname:
type: string(30)
notnull: true
middlename:
type: string(30)
notnull: false
lastname:
type: string(30)
notnull: true
dateOfBirth:
type: date
notnull: true
nationalId:
type: string(13)
notnull: true
gender:
type: enum
length: 1
values: ['M', 'F']

To create random clients will combine PHP code inside the fixtures YaML (data/fixtures/fixtures.yml)file like this:

<?php $names = array('Juan', 'Pedro', 'Perenceo', 'Aquileo', 'Ramiro', 'Esteban',
'John', 'Rabindranath', 'Pablo', 'Judas', 'Akira', NULL); ?>
<?php $lastnames = array('De Urriola', 'Escobedo', 'Einstein', 'Escobar','Gonzalez',
'Luna', 'Martinez', 'Obama', 'Perez',
'Ramirez','Hawkins', 'Marquez', 'Jaramillo',
'Lopez', 'Vergara', NULL); ?>
Client:
<?php for ($i = 1; $i <= 10; $i++): ?>
client_<?php echo $i ?>:
firstname: <?php echo $names[rand(0,count($names)-2)] ."\n" ?>
middlename: <?php echo $names[rand(0,count($names)-1)] ."\n"?>
lastname: <?php echo $lastnames[rand(0,count($lastnames)-2)] ."\n" ?>
nationalId: <?php echo rand(1,9) . '-'.rand(25,999).'-'.rand(1500,9859). "\n" ?>
dateOfBirth: <?php echo "'". rand(1956,1971).'-'.rand(1,12). '-'.rand(1,28) ."'\n" ?>
gender: M
<?php endfor ?>

After running doctrine:data-load the fixtures will create ten cliens records based on the $names and $lastname arrays.

miércoles, 3 de noviembre de 2010

Installation Steps for sfDoctrineGuardPlugin

Steps to install the sfDoctrineGuardPlugin using Netbeans 6.9.x by downloading the package instead of installing it with PEAR.

Download and Installation

Download the correct version of sfDoctrineGuardPlugin, do not download the sfGuardPlugin which is for the Propel ORM.

1. On the sfDoctrineGuardPlugin page http://www.symfony-project.org/plugins/sfDoctrineGuardPlugin click on Download Package select a download directory (/Users/myuser/Downloads).
2. Open the Netbeans right click on the project select Symnfony>Run Commnad...
3. Select plugin:install task.
4. On the parameters field type the path to the downloaded file (for example: /Users/myuser/Downloads/sfDoctrineGuardPlugin-5.0.0.tgz)
5. Click on Run

During the installation I get severl errors like: PHP Deprecated: Function set_magic_quotes_runtime() is deprecated in /Applications/xampp/xamppfiles/lib/php/pear/PEAR/Registry.php on line 790 But the installation seems to work fine.

This process will register the plugin on the project configuration (myproject/Sources Files/config/ProjectConfiguration?.class.php) and copy the plugin to your plugins directory. Verify that the project configuration looks something like this

require_once '/usr/lib/php/symfony/autoload/sfCoreAutoload.class.php';
sfCoreAutoload::register();

class ProjectConfiguration extends sfProjectConfiguration
{
public function setup()
{
$this->enablePlugins('sfDoctrinePlugin');
$this->enablePlugins('sfDoctrineGuardPlugin');
}
}

Verify that a directory with content is under myproject/Sources Files/plugins under the name sfDoctrineGuardPlugin.

Configuration

Table Creation and Data Loading

1. Copy the file myproject/Sources Files/plugins/sfDoctrineGuardPlugin/data/fixtures/fixtures.yml.sample to myproject/Sources Files/data/fixtures
2. Rename myproject/Sources Files/data/fixtures/fixtures.yml.sample to sfGuard_fixtures.yml
3. Open the Netbeans right click on the project select Symnfony>Run Commnad...
4. Select symfony doctrine:build-model
5. Click on Run
6. Select symfony doctrine:build-sql
7. Click on Run
8. Select symfony doctrine:insert-sql
9. Click on Run
10.Select doctrine:build task.
11.On the parameters field type --all --no-confirmation --and-load
12.Click on Run

This will drop the existing tables recreate them, create the sfGuardPlugin tables and load the fixtures from the application and from the sfGuard_fixtures.yml.
Enabling Modules

This configuration assume you have two applications frontend and backend. The frontend will only authenticate and the backend in addition to authentication will have access to create users, groups and permissions.

Backend Configuration

1. Open the myproject/Sources Files/apps/backend/config/settings.yml
2. Find the enabled_modules, if it does not exist create it, add the sfGuardGroup, sfGuardUser and sfGuardPermission. It should look like this:

all:
.settings:
enabled_modules: [default, sfGuardAuth, sfGuardGroup, sfGuardUser, sfGuardPermission]

3. Change the default login and signin modules. Adding this:
    .actions:
login_module: sfGuardAuth
login_action: signin

secure_module: sfGuardAuth
secure_action: secure
4. Save the file.
5. Open the file myproject/Sources Files/apps/backend/config/filters.yml
6. Add the following before the security filter:
    remember_me:
class: sfGuardRememberMeFilter

security: ~
7. Save the file.
8. Open the file myproject/Sources Files/apps/backend/lib/myUser.class.php
9. Change to myUser to inherit from sfGuardSecurityUser instead of sfBasicSecurityUser

class myUser extends sfGuardSecurityUser
{
}

10. Save the file.
11. Open the file myproject/Sources Files/apps/backend/config/security.yml
12. Change the is_secure variable to true:

default:
is_secure: true

Test the access to the sfGuardUser accesing the following url: http://127.0.0.1:9091/backend_dev.php/sfGuardUser Change the host 127.0.0.1:9091 to your host.

Frontend Configuration


1. Open the file myproject/Sources Files/apps/frontend/config/settings.yml
2. Find the enabled_modules, if it does not exist create it, add the sfGuardAuth. It should look like this:

all:
.settings:
enabled_modules: [default, sfGuardAuth]

3. Change the default login and signin modules. Adding this:

.actions:
login_module: sfGuardAuth
login_action: signin

secure_module: sfGuardAuth
secure_action: secure

4. Save the file.
5. Follow steps 5 through 12 of the Backend Configuration for the frontend application.

sábado, 21 de agosto de 2010

Esconder Campos Timestampables en los Forms de Symfony

Cuando se crea una tabla con el "Comportamiento" Timestampable Doctrine agrega un campo created_at y otro updated_at.
Por ejemplo en el schema.yml tendríamos algo como
Brand:
actAs: [Timestampable]
columns:
id:
type: integer(4)
primary: true
autoincrement: true
code:
type: string(15)
notnull: true
name:
type: string(30)
notnull: true
description:
type: string(255)

Cuando se crea un modulo con el comando generate-module el form de edición tiene los campos created_at y updated_at como campos editables. Esto no debería ser.
symfony doctrine:generate-module backend brand Brand --with-show

Para corregir esto es necesario hacer dos cosas:

1. Agregar el siguiente código en el método configure en el archigo myproyecto/lib/form/doctrine/BrandForm.class.php
public function configure()
{
unset($this->widgetSchema['created_at']);
unset($this->validatorSchema['created_at']);
unset($this->widgetSchema['updated_at']);
unset($this->validatorSchema['updated_at']);
}

2. Editar el archivo myproyecto/apps/backend/modules/brand/templates/_form.php eliminando la creación de los widgets para created_at y updated_at.

martes, 29 de junio de 2010

Creando un .EXE a partir de un Jar

Siempre me pregunté como apliaciones como JEdit y Eclipse siendo apliaciones puras en Java utilizaban un ejecutable (.exe) para iniciar. Hace un par de año hice la investigación por curiosidad y no encontré nada práctico.

Nuevamente me encontré con la necesidad de empaquetar un jar y entregarlo como un ejecutable. Para esto encontré dos herramientas (debe haber más, pero mi busqueda solo duro 5 minutos): JSmooth y Launch4J.

JSmooth estaba en en su versión 0.9.7 al momento de este escrito. Se veia amigable pero el código no ha sido actualizado desde el 2007.

Launch4J estaba en su versión 3.0.1 al momento de este escrito. Su último release fue en 2008, por eso me decidí a probarlo.

Fue muy facil crear el exe a partir del jar empaquetado. Es importante notar que el jar que estaba utilizando contenía todas las librerías requeridas. No estoy seguro que haría con jars separados.

sábado, 12 de junio de 2010

Integrando Maven con Eclipse en Mac OSX

Instalando Maven


  1. Baje Maven 2.2.1 del sitio de Maven en formato zip

  2. Descomprimalo en cualquier directorio (/Users/luisberrocal/Downloads por ejemplo).

  3. Mueva el directorio apache-maven-2.2.1 al directorio /usr/share

  4. sudo mv apache-maven-2.2.1 /usr/share

  5. Corre el siguiente commando:
    mvn -version
    Apache Maven 2.2.0 (r788681; 2009-06-26 08:04:01-0500)
    Java version: 1.6.0_20
    Java home: /System/Library/Frameworks/JavaVM.framework/Versions/1.6.0/Home
    Default locale: en_US, platform encoding: MacRoman
    OS name: "mac os x" version: "10.6.3" arch: "x86_64" Family: "mac"
  6. "
  7. Cree un archivo ~/.bash_profile y coloque el siguiente contenido:
    export M2_HOME=/usr/share/apache-maven-2.2.1
    export M2=$M2_HOME/bin
    export JAVA_HOME=/Library/Java/Home/
    export PATH=$PATH:$M2

  8. Abra una sesión nueva de Terminal y corra el siguiente comando para verificar que las variables están incializadas
    echo $JAVA_HOME

Instalando el plugin M2


Los pasos del sitio del plugin M2 son bastante claros y no vale la pena repetirlos, inclusive tienen un video.

Con esto estamos listos para utilizar Maven.

miércoles, 9 de junio de 2010

No respository found at http://subclipse.tigris.org/update_1.6.x

Hace poco trate de instalar el plugin de Subversion para Eclipse y me encontre que no podia conectarme al repositori http://subclipse.tigris.org/update_1.6.x. Eclipse 3.5.2 me daba un mensaje que leia "No respository found at http://subclipse.tigris.org/update_1.6.x".

Después de verificar que tenia conexión de red y que el sitio esta en linea. Empece a investigar. La verdad es que no econtré nada útil.

En un acto deseperado seleccione "Available Software Sites" en la ventana Install (Se invoca desde el menú Help\Install New Software...). Esto abre la ventana Preferences en donde seleccione la librería con el Location http://subclipse.tigris.org/update_1.6.x e hice clic en "Test Connection".

Después de esto empezo a funcionar.

sábado, 5 de junio de 2010

Templates en Eclipse

Plantillas de Eclipse


Eclipse cuenta por defecto con una serie de plantillas que se pueden invocar tecleando un unas cuantas letras e invocando autocomplete (control+space). Entre mis favoritas están:
sysout : crea una linea de código para System.out.println();
main: crea un metodo main con sus argumentos.

Plantillas Personalizadas


Una de las funcionalidades que más me gusta de Eclipse es poder crear plantillas de código que se usa de forma repetitiva. Por ejemplo acostumbro usar la librería Log4J para crear "loggear" información dentro de mi código. Para poder utilizar la clase Logger debo instanciar un objeto en cada clase, esto implica escribir una línea de código como
private static org.apache.log4j.Logger logger = org.apache.log4j.Logger
.getLogger(MapAdminPanel.class);

En lo personal su amigo del copy-paste pero el nombre de la clase varía. Esto implica que si copio el código de arriba en otra clase luego debo editar MapAdminPanel y cambiarlo por el nombre de la clase en que lo copie.

Usando una plantilla (Template) puedo teclear lg dar control+space y Eclipse me insertará el código con en nombre de la clase donde lo estoy creando.

Para crear esta plantilla siga los siguientes pasos:


  1. Abrir Window\Preferences (Eclipse\Preferences en Mac)


  2. Muévase a Java\Editor\Templates y haga clic en New. Llene la pantalla como se muestra.
    Name es el nombre con que se invocara la plantilla en nuestro caso "lg", Context es el contexto en que la plantilla funcionará utilice Java. Pattern es el código que se insertará utilice el siguiente código.

  3. private static org.apache.log4j.Logger logger = org.apache.log4j.Logger
    .getLogger(${enclosing_type}.class);

    Note que en vez de utilizar el nombre de la clase se utiliza la variable enclosing_type. Eclipse reemplazará por usted el nombre de la clase al ser insertado
  4. Haga clic en Ok
  5. Haga clic en Ok en la ventana de Preferences.


Para probarlo abra una clase existente o cree una nueva. Dentro de la clase teclee lg y control+space y le aparecerá las opción de insertar el código.


Guardando las Plantillas


Eclipse guarda la configuración de las plantillas en el workspace. Esto quiere decir que si crea un workspace nuevo tendría que recrear todas las plantillas nuevamente. Afortunadamente podemos exportarlos a un archivo xml y luego importarlo en el nuevo workspace.

Para demostrar la flexibilidad de exportar e importar plantillas vamos a crear una plantilla personalizada adicional.

Regularmente acostumbro "loggear" los errores de una excepción utilizando Log4J en un formato estándar como se muestra:
                try {
passGen.setTemplate("oAAannaonn");
passGen.generatePassword();
logger.debug("Password template: "+ passGen.getPassword());
} catch (ParseException e) {
String msg = "%s: %s";
msg = String.format(msg, e.getClass().getName(), e.getMessage());
logger.error(msg);

fail(msg);
}

El código en negrita se repite una y otra vez a lo largo del código.

Siguiendo los pasos anteriores vamos a crear una plantilla con la siguiente información:
Name: lge
Description: log exception to Log4J
Contrext: Java Statement. Esto forzara que la plantilla solo funcione dentro de un método.
Pattern:
 String msg = "%s: %s";
msg = String.format(msg, e.getClass().getName(), e.getMessage());
logger.error(msg);

Para exportar las plantillas siga los siguientes pasos:

  1. Abrir Window\Preferences (Eclipse\Preferences en Mac)

  2. Muévase a Java\Editor\Templates. Seleccion las plantillas lg y lge.

  3. Haga clic en Export. Asignele un nombre apropiado (logging_templates.xml por ejemplo) y listo.


Este archivo puede ser importado en otro workspace o por otro usuario. Esto permite compartir plantillas estándares.

lunes, 3 de mayo de 2010

Quantum GIS un Contendor Serio

Uno los problemas con el desarrollos de los SIG en Panamá es el costo de los softwares.

El líder indiscutible en software de GIS es ESRI. Y a pesar que tengo un poco más de 12 años de experiencia con los productos de ESRI, sus precios no me parecen cónsonos con las necesidades de países emergente.

Una licencia primaria de ArcInfo está costando aproximadamente $16,000, mientras que las de ArcView está costando $4,000. Esto precios no incluyen extensiones como 3D Analyst o Spatial Analyst que pueden estar costando hasta $3,000 cada una.

Hace algunos años atras durante mis incursiones en Ubuntu, estuve buscando softwares fuente abiera que permitieran realizar análisis SIG y crear mapas. Intente con GRASS pero encontré la instalación e interfase un poco compleja. Luego intenté instalar Quantum GIS (QGIS) pero tuve problemas con la instalación Ubuntu (un problemas con librerías y dependencias) y me rendí.

Hace poco estaba buscando un software sencillo de SIG para mi Mac y me encontré nuevamente con QGIS. Lo que me llamo la atención fue un caso de estudio que como una provincia en Suiza cambio sus sistemas de ESRI a QGIS. Luego de instalar la versión 1.4.0 de forma muy sencilla (ya tienen un dmg) asi que no tuve que compilar ni copiar nada.

En mi prueba preliminar pude hace lo siguiente si hacer grandes investigaciones en Google:

  1. Cargar shape files a un proyecto

  2. Crear un shape file de polígonos nuevo y editar su geometría Aunque tuve problemas con el snapping. Me complacio ver que tiene edición topológica.

  3. Cargar una capa WMS de NASA


No he podido evaluar las capacidades de impresión. Esta es probablemente una de las ventajas más grandes que tienen los productos de ESRI. En ellos es relativamente fácil crear productos de cartográficos de alta calidad.
Me parece QGIS es un contendor serio para softwares de GIS, voy a probarlo más a fondo y pubicaré nuevas entradas.

viernes, 16 de abril de 2010

Web Debug Tool No Aparece!!

Declaro nuevamente mi condición de novato en Symfony. A pesar de ser un framework sumamente poderoso sus niveles de abstracción a veces lo hacen dificil de entender.

Aunque no entiendo algunos de los comportamienntos de Symfony trato de bloggear los "work arounds" mientras investigo las causas reales.

Recientemente el Web Debug Tool desaparecio de mi fronted_dev.php. Primero verifique que en apps/frontend/config/settings.yml la variable web_debug estuviese en true para el ambiente de desarrollo (dev). El archivo debería verse asi:
....
dev:
.settings:
error_reporting: <?php echo (E_ALL E_STRICT)."\n" ?>
web_debug: true
cache: false
no_script_name: false
etag: false
....

Luego recordé que tratando de filtrar los logs de Symfony edite el apps/frontend/config/factories.yml en el ambiente de desarrollo y agregue los que se muestra abajo en rojo:
....
dev:
logger:
class: sfFileLogger
param:
level: err
loggers: ~
file: %SF_LOG_DIR%/%SF_APP%_%SF_ENVIRONMENT%.log

mailer:
param:
delivery_strategy: none
....

Aparentemente esta cambio impacta la visualización del Web Debug Tool para solucionarlo comente el codigo que agregue e inmediatamente aparecio la herramienta.

sábado, 10 de abril de 2010

Logging en Symfony a Logs Externos

Uno de los problemas con los logs de de Symfony es que por defecto se llenan mucho y no he encontrado una maner rápida y práctica de filtrar lo que se escribe.
La forma apropiada es cambiar los filtros en settings.yml, pero no encuentro aún como filtrar por clase como se puede hacer en Log4J.
Mi solución rápida pero poco elegante fue crear un log nuevo para ver exclusivamente lo que me interesaba.
Como esta solución es para realizar un debugging en un problema que estoy teniendo no me he preocupado por uso de memoria ni escalabilidad.

$logger = new sfFileLogger(sfContext::getInstance()->getEventDispatcher(),
array('file'=> sfConfig::get("sf_log_dir").'/debug.log'));

$logger->log("{" . __CLASS__ . "." . __FUNCTION__ . "} Logging test", 2);

Con esto podemos loggear la clase y método desde donde se llama el logger.

Apr 10 12:16:19 symfony [crit] {sfValidatorImgToDB.doClean} Logging test

Mientras encuentro una forma más elegante de filtrar los logs esto me sirve.

miércoles, 24 de marzo de 2010

Configuración de Pruebas JUnit

Durante la realización de pruebas unitarias existen variables comunes en todas las pruebas por ejemplo directorios de salida, directorio de datos etc.

En vez de crear estas variables en cada prueba unitaria utilizo la clase TestConfiguration.

TestConfiguration es Singleton que permite accesar el outputPath (directorio de salida) y el testDataPath (directorio con datos de prueba). Además inicializa el Logger de Log4J.

En el constructor de cada prueba unitaria solo hay que insertar el siguiente código y Log4J queda configurado segun el log4jprops.xml (ver código).


TestConfiguration.getInstance();


El siguiente es el código de TestConfiguration


package org.gissolution.photodb;

import java.io.File;
import java.net.URL;

import org.apache.log4j.xml.DOMConfigurator;

public class TestConfiguration {
private static org.apache.log4j.Logger logger = org.apache.log4j.Logger
.getLogger(TestConfiguration.class);
private static TestConfiguration testConfig = null;
private final String outputPath;
private final String testDataPath;
protected TestConfiguration() {
File out = new File("output");
File data = new File("test_data");
this.outputPath = out.getAbsolutePath();
this.testDataPath = data.getAbsolutePath();
String configfile = "/log4jprops.xml";
URL url = this.getClass().getResource(configfile);
DOMConfigurator.configure(url);
logger.info("Log4j configured with " + url.getFile());

}

public static TestConfiguration getInstance() {
if (testConfig == null) {
testConfig = new TestConfiguration();
}
return testConfig;
}

public String getOutputPath() {
return outputPath;
}

public String getTestDataPath() {
return testDataPath;
}

public static String getExistingTestData(String relativePath) {
String tpath = TestConfiguration.getInstance().getTestDataPath();
File f = new File(tpath + File.separator + relativePath);
if(f.exists()) {
return f.getAbsolutePath();
}else {
throw new IllegalArgumentException(f.getAbsolutePath() + " no existe");
}
}

public static void main(String[] args) {
System.out.println("Output path: " + TestConfiguration.getInstance().getOutputPath());
System.out.println("Test Data path: " + TestConfiguration.getInstance().getTestDataPath());
}

martes, 23 de marzo de 2010

Guardando Imágenes en la Base de Datos con Symfony 1.4

Aunque existen varias escuelas de pensamiento sobre si las imágenes se deben o no guardar en la base de datos. Para mis necesidades especificas es un requerimiento.

Symfony es un framework muy poderoso que apenas estoy empezando a aprender a utilizar. Sin embargo dentro de la documentación no encontré un buen ejemplo de como guardad una imagen en la base de datos como un BLOB y como recuperarla para despliegue.

Después de algo de investigación encontré un excelente posting en un forum del Symfony titulado How to upload an Image to a DB under Symfony 1.4 & display image to an end user por René Kabis donde explicaban como cargar y desplegar las imágenes en un BLOB.

El problema que tuve no era con el posting si no con mi falta de experiencia con Symfony. El posting asume que el usuario tiene al menos experiencia básica con Symfony, asi que decidí crear un guía un poco más detallada.

Creando el Proyecto sfMapGallery


  1. Abra Netbeans y vaya a Menu>New Project...


  2. Seleccione PHP Application y haga clic en Next


  3. Tecle el como Project Name sfMapGallery y haga clic en Next


  4. Cambie el Project URL a http://localhost:9091/ y haga clic en Next este paso asume que su configuración en Apache es en esta dirección


  5. Seleccione Symfony PHP Framework y haga clic en Finish


Creando la Base de Datos


Por defecto se crea el archivo Sources Files\config\databases.yml el mismo debe verse como este:

all:
doctrine:
class: sfDoctrineDatabase
param:
dsn: mysql:host=localhost;dbname=sfMapGallery
username: root
password:

A continuación crearemos una base de de datos con el nombre mapgallery.


  1. Edite el archivo Sources Files\config\databases.yml y cambie el dbname por mapgallery

    dsn: mysql:host=localhost;dbname=mapgallery
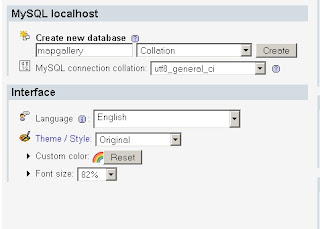
  2. Abra phpMyAdmin (con WAMP el url es http://localhost/phpmyadmin/) y cree una nueva base de datos con el nombre mapgallery


  3. Copie el siguiente contenido en el archivo Sources Files\config\doctrine\schema.yml

    Map:
    tableName: maps
    connection: doctrine
    actAs: [Timestampable]
    options:
    type: INNODB
    collate: utf8_unicode_ci
    charset: utf8
    columns:
    id:
    type: integer(4)
    primary: true
    autoincrement: true
    filename:
    type: string(50)
    image:
    type: blob
    tags:
    type: string(150)

  4. Corra el comando symfony doctrine:build --all --no-confirmation . Este comando debe crear la tabla en la base de datos y el modelos, las formas y los filtros en Sources Files\lib

Creando el Validador de Imágenes


  1. Cree el directorio Sources Files\lib\validator

  2. Copy el archivo <Directorio Instalación Symfony>\lib\validator\sfValidatorFile.class.php

  3. Renombre el archivo Sources Files\lib\validator\sfValidatorFile.class.php a sfValidatorImgToDB.class.php

  4. Abra el archivo sfValidatorImgToDB.class.php y :

    1. Cambie el nombre de la clase a sfValidatorImgToDB
      ...
      class sfValidatorImgToDB extends sfValidatorBase {
      ...
    2. En el método configure adicione la opcion resolution (aprox. linea 75) y comente las optiones validated_file_class y path.
      ...
      $this->addOption('mime_categories', array(
      'web_images' => array(
      'image/jpeg',
      'image/pjpeg',
      'image/png',
      'image/x-png',
      'image/gif',
      )));
      $this->addOption('resolution');
      //$this->addOption('validated_file_class', 'sfValidatedFile');
      //$this->addOption('path', null);

      $this->addMessage('max_size', 'File is too large (maximum is %max_size% bytes).');
      ...

    3. En el método doClean comente las dos últimas lineas e inserte el código mostrado
      ...
      if ($this->hasOption('mime_types')) {
      $mimeTypes = is_array($this->getOption('mime_types')) ? $this->getOption('mime_types') : $this->getMimeTypesFromCategory($this->getOption('mime_types'));
      if (!in_array($mimeType, array_map('strtolower', $mimeTypes))) {
      throw new sfValidatorError($this, 'mime_types', array('mime_types' => $mimeTypes, 'mime_type' => $mimeType));
      }
      }

      //$class = $this->getOption('validated_file_class');
      //return new $class($value['name'], $mimeType, $value['tmp_name'], $value['size'], $this->getOption('path'));

      // check resolution

      if ($this->hasOption('resolution')) {
      $resolution = (is_array($this->getOption('resolution')) && count($this->getOption('resolution'))==2) ? $this->getOption('resolution') : null;
      if (is_int($resolution[0]) && is_int($resolution[1]) && ($resolution[0]/$resolution[1] == 4/3)) {
      $width = $resolution[0];
      $height = $resolution [1];
      }else {
      $width = 1024;
      $width = 768;
      $ratio = 4/3;
      }
      }

      return base64_encode($this->catchImage($value['tmp_name'], $width, $height));
      }

      ...

    4. Después del metodo doClean agregue los metodos catchImage y resizeImage
      ...
      public function catchImage($image, $width, $height) {
      if($image) {
      $data=fread(fopen($image, "r"), filesize($image));
      unlink($image);
      return $this->resizeImage(imagecreatefromstring($data), $width, $height);
      }
      }

      public function resizeImage($image, $width, $height) {
      $old_width = imagesx($image);
      $old_height = imagesy($image);
      $ratio=$old_width/$old_height;
      $resized_img = imagecreatetruecolor($width,$height);
      $white = imagecolorallocate($resized_img, 255, 255, 255);
      imagefill($resized_img, 0, 0, $white);
      if($ratio>(4/3)) {
      $new_width=$width;
      $new_height=($width*($old_height/$old_width));
      $x_offset=0;
      $y_offset=(($height-$new_height)/2);
      }elseif($ratio<(4/3)) { $new_width=($height*($old_width/$old_height)); $new_height=$height; $x_offset=(($width-$new_width)/2); $y_offset=0; }else { $new_width=$width; $new_height=$height; $x_offset=0; $y_offset=0; } imagecopyresampled($resized_img, $image, $x_offset, $y_offset, 0, 0, $new_width, $new_height, $old_width, $old_height); ob_start(); imageJPEG($resized_img); $new_image = ob_get_contents(); ob_end_clean(); return $new_image; }

      ...

    5. Guarde el archivo


  5. Abra el archivo Sources Files\lib\form\doctrine\MapForm.class.php y agreue el siguiente código en el método configure.

    class MapForm extends BaseMapForm
    {
    public function configure()
    {
    $this->setWidgets(array(
    'id' => new sfWidgetFormInputHidden(),
    'filename' => new sfWidgetFormInputText(),
    'image' => new sfWidgetFormInputFileEditable(array('label'=>'Map', 'file_src'=>'', 'is_image'=>true, 'edit_mode'=>!$this->isNew(),'template'=>'%input%')),
    'tags' => new sfWidgetFormInputText(),
    'created_at' => new sfWidgetFormDateTime(),
    'updated_at' => new sfWidgetFormDateTime(),
    ));

    $this->setValidators(array(
    'id' => new sfValidatorDoctrineChoice(array('model' => $this->getModelName(), 'column' => 'id', 'required' => false)),
    'filename' => new sfValidatorString(array('max_length' => 50, 'required' => false)),
    'image' => new sfValidatorImgToDB(array('resolution'=>array(1024, 768), 'mime_types'=>array('image/jpeg', 'image/jpg', 'image/pjpeg'), 'required'=>true)),
    'tags' => new sfValidatorString(array('max_length' => 150, 'required' => false)),
    'created_at' => new sfValidatorDateTime(),
    'updated_at' => new sfValidatorDateTime(),
    ));

    $this->widgetSchema->setNameFormat('map[%s]');

    $this->errorSchema = new sfValidatorErrorSchema($this->validatorSchema);
    }
    }

Probando el Validador


  1. Corra el commando symfony doctrine:generate-module --with-show frontend maps Map

  2. Abra la dirección http://localhost:9091/frontend_dev.php/maps


Desplegando la Imagen


  1. Corra el comando symfony generate:module frontend image. Esto creará la carpeta image en Source Files\apps\frontend\modules.


  2. Abra el archivo Source Files\apps\frontend\modules\templates\indexSuccess.php agregue el siguiente código
    <?php echo $image; ?>


  3. Abra el archivo Source Files\apps\frontend\modules\image\actions\actions.class.php reemplaze el código del método executeIndex por el siquiente:
    ...

    public function executeIndex(sfWebRequest $request) {
    $idreq = $request->getParameter('id');
    $data = Doctrine::getTable('Map')->find($idreq)->getData();
    $this->image = base64_decode($data["image"]);
    sfConfig::set('sf_web_debug', false);
    sfConfig::set('sf_escaping_strategy', false);
    }
    ...
  4. Cree el directorio Source Files\apps\frontend\modules\image\config

  5. Cree el archivo Source Files\apps\frontend\modules\image\config\view.yml, agregue el siguiente contenido al archivo:
    indexSuccess:
    has_layout: false
    http_metas:
    content-type: image/jpeg
    downloadSuccess:
    has_layout: false
    http_metas:
    content-type: image/jpeg
  6. Abra el archivo Source Files\apps\frontend\config\routing.yml , y agregue el siguiente código antes del registro default:
    ...
    default_index:
    url: /:module
    param: { action: index }
    image_handler:
    url: /image/:id/*
    class: sfRoute
    options:
    model: Photo
    type: object
    param: { module: image, action: index }
    requirements:
    id: \d+
    sf_method: [GET]

    default:
    url: /:module/:action/*
  7. Abra el archivo Source Files\apps\frontend\modules\photo\templates\indexSuccess.php y cambie el codigo que despliega la imagen:
    ...
    <td><?php echo $map->getFilename() ?></td>
    <td><img src="<?php echo url_for('@default?module=image&action=index&id='.$map->getId()) ?>" height="100px"/> </td>
    <td><?php echo $map->getTags() ?></td>
    ...