jueves, 29 de diciembre de 2011

Configuring Mac Lion for Symfony2 Development

Contents

When I first started with Symfony 1.4.x in Snow Leopard I installed XAMPP and it worked fine.
I recently discovered that Lion OsX comes with Apache and PHP installed [1] , so all I'm missing is MySQL and phpMyAdmin and I'm set.

1 Setting up Apache

1.1 Turning Web Sharing On

  1. Open System Preferences
  2. Click on Sharing on Internet & Wireless.
  3. Turn On Web Sharing

1.2 Activate the PHP Module on Apache

  1. Open Terminal

  2. Type:

    sudo mate /private/etc/apache2/httpd.conf

  3. Search for php5_module and uncomment it (eliminate the #).
    The content will look like this:

LoadModule alias_module libexec/apache2/mod_alias.so
LoadModule rewrite_module libexec/apache2/mod_rewrite.so
LoadModule php5_module libexec/apache2/libphp5.so

#Apple specific modules
LoadModule apple_userdir_module libexec/apache2/mod_userdir_apple.so
  1. Save the file.

  2. Now you must restart Apache, on Terminal type:

    sudo apachectl restart

1.3 Testing Apache Configuration

Open a Web browsert and type inth address bar http://localhost.

You should get a page that reads:

It works!

1.4 Setting the Time Zone on php.ini

All the following operations require sudo

  1. Copy the file /etc/php.ini.default to /etc/php.ini

  2. Open the /etc/php.ini and set the correct time zone.
    My timezone is Panama.

    date.timezone = AMERICA/PANAMA

1.5 Testing the PHP works with PHP

  1. Open Terminal and type:

    cd /Library/WebServer/Documents/

  2. Type:

    sudo touch test.php

  3. Type:

    sudo mate test.php

  4. On Textmate add the following code

<?php phpinfo(); ?>
  1. Save the file.

Open a Web browsert and type inth address bar http://localhost/test.php.

2 Installing and Configuring MySQL

2.1 Installing MySQL Community Server 5.5.19

  1. Download the Mac OS X ver. 10.6 (x86, 64-bit), DMG Archive from Download MySQL Community Server.
  2. Double click on the mysql-5.5.19-osx10.6-x86_64.dmg file to open and mount the dmg.
  3. Double click on the mysql-5.5.19-osx10.6-x86_64.pkg file.
  4. Follow the installer and accept all the default values. It will ask you for your master
    password.

Warning

/usr/local/mysql is only symlink to /usr/local/mysql-5.5.19-osx10.6-x86_64 which means when you upgrade to new
version symlink will be changed to point to new version but won’t be deleting the older version. However you
need to copy your data directory to new location to make sure your existing databases are intact post upgrade [2].

2.2 Installing the Startup Scritps

You can startup mysql by going to Terminal and typing “/usr/local/mysql/bin/mysqld_safe &”.
We are going to install the startup scrips so we'll be able to start/stop mysql from
System Preferences.

  1. Double click on MySQLStartupItem.pkg and follow on screen instructions.
  2. Double click MySQL.prefPane which will add MySQL to OS X System Preferences.
  3. Select Install for all users of this computer.
  4. Select Automatically Start MySQL Server on Startup

2.3 Installing Sequel Pro

I was going to install phpMyAdmin but read an article that mentioned Sequel Pro [3] so I decided to try it out.

  1. Download Sequel Pro 0.9.9.1 from http://www.sequelpro.com/download/
  2. Double click on Sequel_Pro_0.9.9.1.dmg to open it.
  3. Drag and drop the Sequel Pro icon to your Applications folder.
  4. Double click the Sequel Pro icon.
  5. For Host type 127.0.0.1
  6. For Username type root.
  7. For Password leave blank.

2.4 Configure mysql.sock

Now we need to create a symlink for PHP to be able to access the mysql.sock. Trouble is if you try it you’ll get an error because /var/mysql doesn’t exist [4].

  1. From terminal, run:

    sudo find / -name mysql.sock -print

    The installer installed the sock in /private/tmp/mysql.sock

  2. Run

    sudo mkdir /var/mysql

  3. Run

    sudo ln -s /private/tmp/mysql.sock /var/mysql/mysql.sock

3 Creating a Quick Symfony2 Project to Test Configuration

3.1 Installing Symfony2

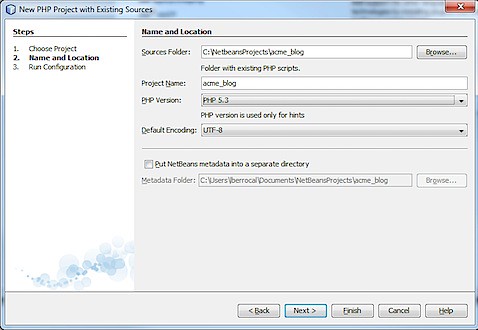
  1. Download Symfony2 on zip format.

  2. Unzip the file Symfony_Standard_Vendors_2.0.8.zip to your working directory.

  3. Rename the symfony directory to lion_test

  4. Open a Terminal and move to the lion_test directory.
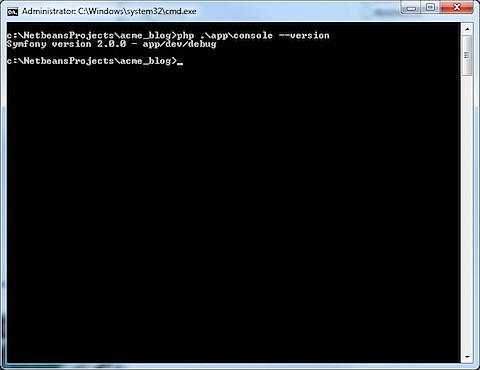
    Run:

    php ./app/console --version

    Symfony version 2.0.8 - app/dev/debug

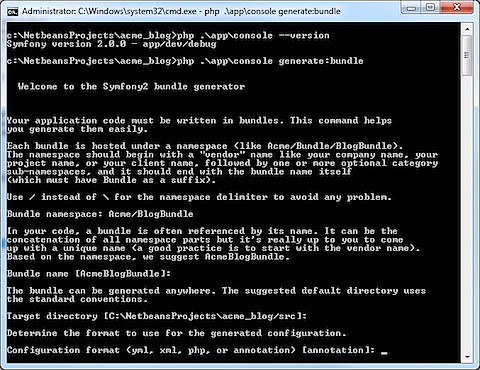
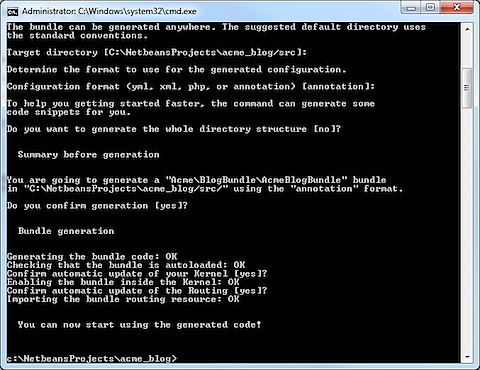
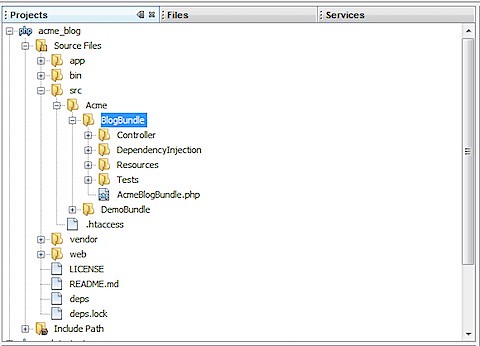
3.2 Creating a Bundle

On terminal run php ./app/console generate:bundle name the Bundle namespace LionTest/PeopleBundle.
Accept all defaults values except Do you want to generate the whole directory structure answer yes.

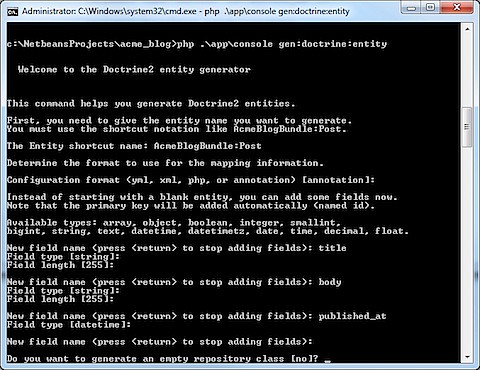
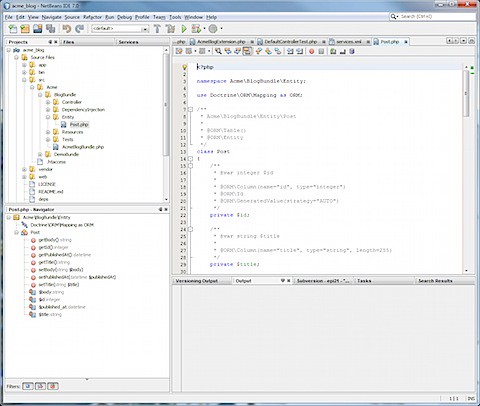
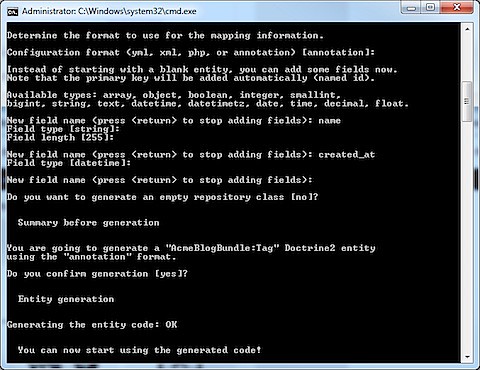
3.3 Generating Doctrine Entities

On terminal run php ./app/console gen:doctrine:entity. Create an entity with the Shortcut name
LionTestPeopleBundle:People. Use the following data for the columns

ColumnTypeSize
last_namestring80
first_namestring80
date_of_birthdate
dob_fuzzynessinteger

Accept values for defaul except on Do you want to generate an empty repository class answer yes.

3.4 Connecting to the Database

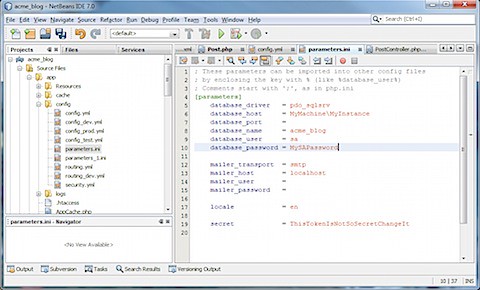
3.4.1 Connection Parameters

Open /lion_test/app/config/parameters.ini and change the database to people.

[parameters]
database_driver = pdo_mysql
database_host = localhost
database_port =
database_name = people
database_user = root
database_password =

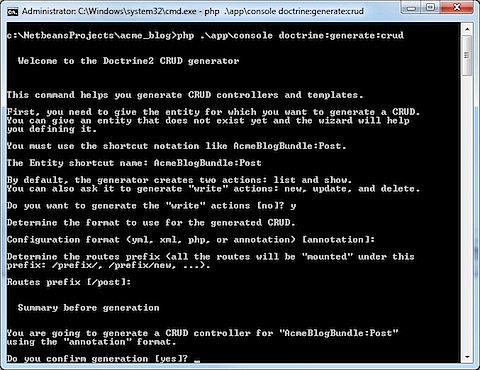
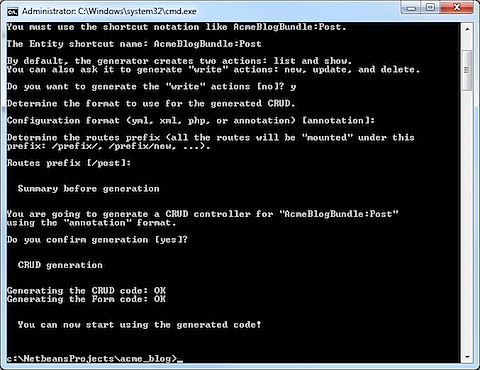
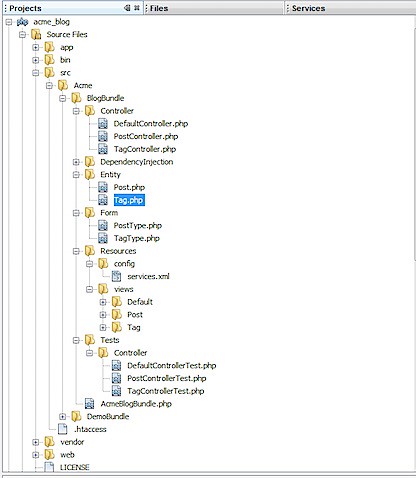
3.4.2 Generating CRUD Controllers and Templates

On terminal run php ./app/console doctrine:generate:crud create a the crud forms for
LionTestPeopleBundle:People create the write actions.

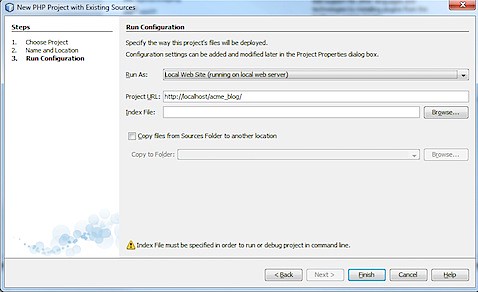
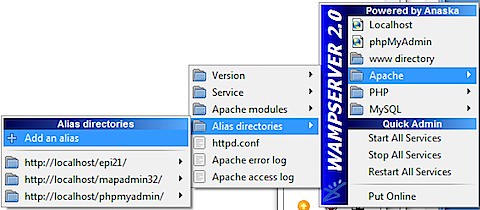
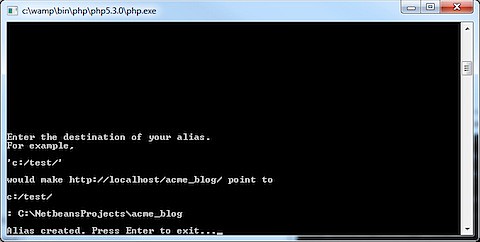
3.5 Configuring Apache to access your Symfony2 Site

Since the purpose of this entry is configure your Mac for Symfon2 development
I'm not going to bother the creation of a virtual directory con Apache that points
to your development folder.

So I'm simply going to copy my lion_test to /Library/WebServer/Documents/.
The run the following commands inside the directory

sudo chmod -R app/logs
sudo chmod -R app/cache

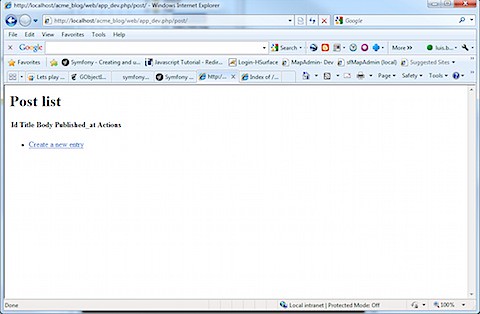
Now run http://localhost/lion_test/web/app_dev.php/people/ and you should access
the People List page.


Enjoy!!

[1]Install Apache and PHP on Mac OS X Lion (No XAMPP required) http://www.youtube.com/watch?v=iIZ1gfDjjL0

[2]Installation of MySQL server on Mac OS X Lion http://www.djangoapp.com/blog/2011/07/24/installation-of-mysql-server-on-mac-os-x-lion/

[3]Getting MySQL work on OSX 10.7 Lion http://stackoverflow.com/questions/6317614/getting-mysql-work-on-osx-10-7-lion

[4]How to install MySQL 5.5 on Mac OS X 10.7 Lion http://blog.salientdigital.com/2011/09/08/how-to-install-mysql-5-5-on-mac-os-x-10-7-lion/

sábado, 24 de diciembre de 2011

Installing restructuredText Bundle for TextMate

I recently discovered restructuredText and got TextMate some time ago but haven't been able to play
with it. I'm trying to blog with it. So I looked up if there were any Bundles for TextMate (not that I'm that clear on what a bundle is).

Install Docutils

Download Docutils 0.8.1 .

On Terminal run:

sudo setup.py install

You will get a an output like this:

running install
running build
running build_py
running build_scripts
running build_data
running install_lib
running install_scripts
changing mode of /usr/local/bin/rst2html.py to 755
changing mode of /usr/local/bin/rst2latex.py to 755
changing mode of /usr/local/bin/rst2man.py to 755
changing mode of /usr/local/bin/rst2odt.py to 755
changing mode of /usr/local/bin/rst2odt_prepstyles.py to 755
changing mode of /usr/local/bin/rst2pseudoxml.py to 755
changing mode of /usr/local/bin/rst2s5.py to 755
changing mode of /usr/local/bin/rst2xetex.py to 755
changing mode of /usr/local/bin/rst2xml.py to 755
changing mode of /usr/local/bin/rstpep2html.py to 755
running install_data
running install_egg_info
Removing /Library/Python/2.7/site-packages/docutils-0.8.1-py2.7.egg-info
Writing /Library/Python/2.7/site-packages/docutils-0.8.1-py2.7.egg-info

Install reStructuredText TextMate Bundle

Download the bundle in zip format from https://github.com/textmate/restructuredtext.tmbundle.

Unzip the file to a temporary location. In my case ~/Downloads/textmate-restructuredtext.tmbundle-edfe62e.
Edit the folder name from textmate-restructuredtext.tmbundle-edfe62e to textmate-restructuredtext.tmbundle using
Finder. The icon for the folder should change.

Open Terminal. Type the following commands:


mkdir -p ~/Library/ApplicationSupport/TextMate/Bundles


cp -r ~/Downloads/textmate-restructuredtext.tmbundle ~/Library/ApplicationSupport/TextMate/Bundles


Configure Environment Variables

I tried creating the variables using export but for some reason it didn't work. After doing some research
it seems there are several ways to declare environment list (using launchctl, using environment.plit and using export).
None of these methods worked for me on Lion, while trying to declare the TM_RST2HTML.

I kept getting the following error:

Couldn't find rst2html.py
You can either set the TM_RST2HTML variable to the full path of your docutils (docutils.sourceforge.net) installation (e.g. /Library/Frameworks/Python.framework/Versions/2.4/bin/rst2html.py or set the PATH variable to include the path of the docutils converters.
Locations searched:
/Applications/TextMate.app/Contents/SharedSupport/Support/bin/CocoaDialog.app/Contents/MacOS
/usr/bin
/bin
/usr/sbin
/sbin
/usr/local2/bin
/Applications/TextMate.app/Contents/SharedSupport/Support/bin

What finally worked for me was opening TextMate and going to TextMate\Preferences on Advanced on Shell Variable
added to the PATH variable /usr/local/bin.

martes, 9 de agosto de 2011

My First Symfony2 project with MS SQL Server 2008

A couple of days ago Symfony2 was finally released. I had been waiting for it because it promised to work with MS SQL Server 2008 via Doctrine2. I know what you're thinking why use SQL Server? Well let's just say that it's a job requirement.


This post attempts to replicate the example show on the Symfony site for Interactive Generators on Windows with a couple of twists. First I attempt to use MS SQL Server 2008 and add complex relationship between Posts and Tags as proposed on http://www.dobervich.com/2011/03/05/symfony2-blog-application-tutorial-part-ii-the-data-model/ .


Installation


I´ll be using Wamp 2.0 with PHP 5.3.6 (to learn how to configure PHP 5.3.6 with Wamp read http://markushedlund.com/dev-tech/install-php-5.3.3-on-wamp ) and MS SQL Server 2008 R2 (Express).


Download Simfony2.0.0 zip file.


Make sure php.exe is in your path variable.


Unzip the content of the zip file into your netbeans project directory (C:\NetbeansProjects for me).


Rename the Symfony directory to acme_blog.


Open a command window and move to the acme_blog directory.


Run php .\app\console --version.


You should get the version of Symfony as shown:


201108092141.jpg


Generating a Blog Bundle


On the command window run:


php .\app\console generate:bundle


Fill the data as follows:


Bundle namespace: Acme/BlogBundle


Bundle name[AcmeBlogBundle]:


Target directory [C:\NetbeansProjects\acme_blog/src]:


Configuration format (yml, xml, php, or annotation) [annotation]:


201108092143.jpg


Do you want to generate the whole directory structure [no]?


Do you confirm generation [yes]?


Confirm automatic update of your Kernel [yes]?


Confirm automatic update of the Routing [yes]?


201108092144.jpg


Opening the Project with Netbeans 7.0


Open Netbeans select File\New Project…


Select PHP Application with Existing Sources.


201108092145.jpg


Click Next.


Select the source folder where you unzipped the Symfony framework.


Select PHP Version: 5.3


201108092146.jpg


Click Next.


201108092146.jpg


Click Next.


On the Projects tabe you should be able to see the BlogBundle.


201108092147.jpg


Generating the Doctrine Entities


All the magic of Symfony 1.4.x where you created your schema con your schema.yml file and with a build --all command you would get your entities and database created for you are gone.


With Symfony 2 you use the gen:doctrine:entity command to dynamically create an entity.


Post Entity


We are going to create an entity name Post, that has three fields title (String (255)), body (String(255)) and published_at (datetime).


On a command window type:


php .\app\console gen:doctrine:entity


The Entity shortcut name: AcmeBlogBundle:Post


Add the three fields as shown:


201108092147.jpg


Do you want to generate an empty repository class [no]?


Do you confirm generation [yes]?


Look for the entity in your Netbeans Project under acme_blog\src\Acme\BlogBundle\Entity\Post.php


201108092148.jpg


Tag Entity


We are going to create an entity name Tag, that has two fields name (String (255)) and created_at (datetime).


On a command window type:


php .\app\console gen:doctrine:entity


The Entity shortcut name: AcmeBlogBundle:Tag


Add the two fields as shown:


201108092149.jpg


Manually Create the Many to Many Relationship


Open the Post.php file and add the following code at the beginning


use Doctrine\Common\Collections\ArrayCollection;


Under the published at field add the following code:


/**


* @ORM\ManyToMany(targetEntity="Tag")


* @ORM\JoinTable(name="post_tag", joinColumns={@ORM\JoinColumn(name="post_id", referencedColumnName="id")}, inverseJoinColumns={@ORM\JoinColumn(name="tag_id", referencedColumnName="id")} )


* @var ArrayCollection $tags


*/


private $tags;


….


public function getTags(){


return $this->tags;


}


public function setTags($tags){


$this->tags =$tags;


}


Overriding the __ToString() function on Tags


public function __toString(){


return $this->name;


}


Create a Database


Start Wamp.


Create the Database Manually


Open Microsoft SQL Server Managemente Studio.


Right click con Databases and select New Database.


On the New Database window. Type acme_blog on the Database name and select sa as Owner.


Edit the parameters.ini


Edit the Source Files\app\config\parameters.ini


Change the database_name to acme_blog, database_host to your instance, database_user to sa and database_password to your sa password.


201108092155.jpg


On a command window type:


php .\app\console doctrine:schema:create


This will create the table Post, Tag and post_tag.


Generating CRUD Controllers and Templates


On a command window type:


php .\app\console doctrine:generate:crud


The Entity shortcut name: AcmeBlogBundle:Post


Do you want to generate the "write" actions [no]? y


Configuration format (yml, xml, php, or annotation) [annotation]:


Routes prefix [/post]:


201108092156.jpg


Do you confirm generation [yes]?


201108092156.jpg


This action creates the Views and Forms as well as the entries in the PostController.


Repeat the process for the Tag entity.


201108092157.jpg


Testing the Bundle


Click on the Wamp icon and click on Apache\Alias directories\Add an alias.


201108092157.jpg


Use acme_blog as alias and point to C:\NetbeansProjects\acme_blog.


201108092158.jpg


Access the url http://localhost/acme_blog/web/app_dev.php/post/. You should be able to add a Post.


201108092158.jpg


sábado, 30 de julio de 2011

Using BETWEEN syntax with Symfony 1.4.x and MS SQL Server 2008

I´m using Symfony 1.4.8 and MS SQL Server 2008.

I had a query that read:


$q = Doctrine_Query::create()
->select('m.mapdate, m.created_at')
->from('GISMap m')
->where('m.mapdate BETWEEN ? AND ?', array($start_date, $end_date))
->orderBy('m.mapdate DESC');

This worked perfectly in MySQL, but when I switched to MS SQL Server I got an error like this one:


500 | Internal Server Error | Doctrine_Connection_Mssql_Exception


SQLSTATE[HY000]: General error: 10007 Incorrect syntax near '?'. [10007] (severity 5) [SELECT [g].[id] AS [g__id], [g].[mapdate] AS [g__mapdate], [g].[created_at] AS [g__created_at] FROM [gis_map] [g] WHERE ([g].[mapdate] BETWEEN '2010-03-24 10:32:24' AND ?) ORDER BY [g].[mapdate] DESC]. Failing Query: "SELECT [g].[id] AS [g__id], [g].[mapdate] AS [g__mapdate], [g].[created_at] AS [g__created_at] FROM [gis_map] [g] WHERE ([g].[mapdate] BETWEEN '2010-03-24 10:32:24' AND ?) ORDER BY [g].[mapdate] DESC"


After doing some research I found out that the replacement of the ? for the actual values is done by the PDO driver. So I decided that the problem was the driver for SQL Server didn´t like the array being passed to it.


I change the syntax to:

$q = Doctrine_Query::create()
->select('m.mapdate, m.created_at')
->from('GISMap m')
->where('m.mapdate >= ?', $start_date)
->andWhere('m.mapdate <= ?', $end_date)
->orderBy('m.mapdate DESC');

Now it works. It´s annoying to have to do this, but it´s been my experience that working with SQL Server will get you into these troubles.


Maven Error: Could not calculate build plan

I recently had to change computre and had some trouble with Maven.

I got the following message on Eclipse 3.5.2:

Could not calculate build plan: Failure to transfer org.apache.maven.plugins:maven-resources-plugin:pom:2.4.3 from http://repo1.maven.org/maven2 was cached in the local repository, resolution will not be reattempted until the update interval of central has elapsed or updates are forced. Original error: Could not transfer artifact org.apache.maven.plugins:maven-resources-plugin:pom:2.4.3 from/to central (http://repo1.maven.org/maven2): Failed to transfer http://repo1.maven.org/maven2/org/apache/maven/plugins/maven-resources-plugin/2.4.3/maven-resources-plugin-2.4.3.pom. Error code 400, Bad Request jsimpleutils Unknown Maven Problem

On the following post http://vikashazrati.wordpress.com/2010/06/26/could-not-calculate-build-plan-missing-maven-resources-pluginmaven-plugin2-4-1/ a guy pointed out the he could find the directory but it had a filed with the extension .lastUpdated.

The solution was to delete the file with the .lastUpdated extension (maven-resources-plugin-2.4.1.maven-plugin.lastUpdated) and ran from eclipse maven->Update Project Configuration and the problem was resolved.


sábado, 23 de julio de 2011

Using IIS 7.5 with URL Rewrite and Symfony

The IIS URL Rewrite 2.0 is IIS module that promises to do what the mod_rewrite does for Apache.


Download the URL Rewrite module from http://www.iis.net/download/urlrewrite .


Installation


Install the rewrite_2.0_rtw_x32.msi (or rewrite_2.0_rtw_x64.msi if you´re using a 64bit OS).


201107231141.jpg


201107231142.jpg


Check the the fastcgi is properly configured in your php.ini. This is not part of the installation of the URL Rewrite module but I had to do it because I changed from PHP 5.3 to 5.2 (due to the reasons explained at http://tecnofuenteabierta.blogspot.com/2010/12/running-symfony-14-with-ms-sql-server.html ).


cgi.force_redirect=0


fastcgi.impersonate=1


fastcgi.logging=0


extension_dir = "C:\PHP\ext"


extension=php_pdo.dll


Importing the Rules


Next thing you need is to import the rules from the .htaccess file.


Open the Internet Information Services (IIS) Manager on the left pane click on your site (for details on how to configure IIS for Symfony take a look at [2]) and you´ll see an icon URL Rewrite


201107231152.jpg


Double click on the URL Rewrite icon. On the left pane named Actions click on Import Rules…


Select the .htaccess file on your web folder and click Import. Click on Apply.


201107231153.jpg

Click on Back to Rules… and you´ll see the rules imported.


201107231153.jpg

What this does is write a web.config file on your web folder than contains the rules for the URL Rewrite module and other fun thing Microsoft deems important.


Note: If you´re using rsync to update your site with –delete option be sure to copy the web.config file otherwise it will delete every time you update with rsync.


rsync -avr --delete --exclude-from=‘ path/exclude.txt‘ source/dir target/dir


201107231154.jpg


CREATOR OWNER SPECIAL


SYSTEM FULL CONTROL


ADMGISSVR SPECIAL


Administrators Full Control


Users Read & execute, List folder contents, Read


References


[1] http://www.iis.net/download/urlrewrite


[2] http://www.symfony-project.org/more-with-symfony/1_4/en/11-Windows-and-Symfony


jueves, 10 de marzo de 2011

Making IIS 7 serve MrSID Files

Until IIS 6 in order to serve MrSID files all you had to do was assign the proper NTFS permissions to the folder where the files were located and create a virtual directory in IIS. If you only do that and try to access a URL to an MrSID file on II 7 you´ll get a “404 - File or directory not found.” . The error message is confusing since the directory does exist. Finally figured there where restrictions with the MIME type, it seems IIS 7 only serves MIME you specifically declared.

To declare a new MIME type for MrSID you have to add an additional step.

1. Open the IIS Manager

2. Click on the virtual directory or directory

3. Click on MIME Types

4. Click on Add…

5. Fill the File name extension as .sid and the MIME type as application/octet-stream


6. Click Ok.

Now you should be able to access your MrSID via an URL.

martes, 8 de marzo de 2011

Using Pagination with Symfony and Doctrine 2

When I blogged Using Pagination with Symfony and Doctrine I had being trying to understand the inner working of the Symfony's Admin Generator. At the time it seem a good solution. But, when I started implementing the idea, I realized that I had to repeat very similar code on each of the of the actions of the modules I was working.
So I decided to try a different aproach. I put all de code I was using in the actions in a utility class, created a widget to render the header and added a partial to render how many items in the table and the total number of pages. The final goal was to create my first Symfony plugin, but I'm not quite there yet, so I decided to blog first this improvement.
The Pagination Control
Since it's the same control I proposed in my previous blog Using Pagination with Symfony and Doctrine I will not repeat the code. You still need to get the images for buttons and place them in your web\images folder.
The Pagination Info Control
Create a file named /myproject/apps/myapplication/templates/_pagination_info.php and copy the following code on it. Then save it.
<div class="pagination_info">
<?php echo format_number_choice('[0] no result|[1] 1 result|(1,+Inf] %1% results',
array('%1%' => $pager->getNbResults()), $pager->getNbResults(), 'sf_admin') ?>
<?php if ($pager->haveToPaginate()): ?>
<?php echo __('(page %%page%%/%%nb_pages%%)', array('%%page%%' => $pager->getPage(),
'%%nb_pages%%' => $pager->getLastPage()), 'sf_admin') ?>
<?php endif; ?>
</div>
Creating the Paging Utility
Create a file named /myproject/lib/model/PagingUtility.class.php and copy the following code on it. Then save it.
This class will take care of all the code previously had to copy into the actions.
class PagingUtility {
private $modelname;
private $sortkey;
private $user;
private $modulename;

public function __construct($modelname, $user) {
$this->modelname=$modelname;
$this->user =$user;
$this->sortkey =strtolower($this->modelname).".sort";
$this->modulename = strtolower($this->modelname) . "_module";
}

public function buildPager($request, $items_x_page,$query=NULL){
if ($request->getParameter('sort') && $this->isValidSortColumn(
$request->getParameter('sort'))) {
$this->setSort(array($request->getParameter('sort'),
$request->getParameter('sort_type')));
}

// $items_x_page = sfConfig::get('app_max_items_x_page');
$pager = new sfDoctrinePager($this->modelname, $items_x_page);
//$device = is_null($coffeeMaker) ? "hands" : $coffeeMaker;
$query = is_null($query) ? $this->buildQuery() : $query;
$pager->setQuery($query);
$pager->setPage($request->getParameter('page', 1));
$pager->init();
return $pager;
// $this->sort = $this->getSort();
}
protected function buildQuery() {
$et = Doctrine_Core::getTable($this->modelname);

$query = $et->createQuery();

$this->addSortQuery($query);

return $query;
}

protected function addSortQuery($query) {
if (array(null, null) == ($sort = $this->getSort())) {
return;
}

if (!in_array(strtolower($sort[1]), array('asc', 'desc'))) {
$sort[1] = 'asc';
}
$query->addOrderBy($sort[0] . ' ' . $sort[1]);
}

public function getSort() {
if (null !== $sort = $this->user->getAttribute($this->sortkey,
null, $this->modulename)) {
return $sort;
}

$this->setSort(array(null, null));

return $this->user->getAttribute($this->sortkey,
null, $this->modulename);
}

protected function setSort(array $sort) {
if (null !== $sort[0] && null === $sort[1]) {
$sort[1] = 'asc';
}
$this->user->setAttribute($this->sortkey, $sort, $this->modulename);
}

protected function isValidSortColumn($column) {
return Doctrine::getTable($this->modelname)->hasColumn($column);
}
}
Creating the Sortable Header Widget
I'm not sure if creating a widget for this purpose would be the best approach, but I wanted to make my own widget a see how it worked. The code is an adaption of the code from a previous blog entry Sorting Lists in Symfony.
Create a file named /myproject/lib/widget/maSortableHeader.php and copy the following code on it. Then save it.
class maSortableHeader extends sfWidgetForm {

protected function configure($options = array(), $attributes = array()) {
$this->addOption('fieldname');
$this->addOption('fieldlabel');
$this->addOption('routename');
$this->addOption('sort');
}

public function render($name, $value = null, $attributes = array(), $errors = array()) {
$sort = $this->getOption('sort');

if ($this->getOption('fieldname') == $sort[0]) {
$config = array('query_string' => 'sort=' . $this->getOption('fieldname') . '&sort_type=' .
($sort[1] == 'asc' ? 'desc' : 'asc'));
$uri = link_to($this->getOption('fieldlabel'), $this->getOption('routename'),
$config);
$uri .= image_tag('/images/' .
$sort[1] . '.png', array('alt' => $sort[1],
'title' => $sort[1]));
} else {
$uri = link_to($this->getOption('fieldlabel'), $this->getOption('routename'),
array('query_string' => 'sort=' . $this->getOption('fieldname') . '&sort_type=asc'));
}

return $uri;
//optional - for easy css styling
}

}
Editing the Action


On our action we're going to implement our PagingUtiliy and add widets for two columns (Code and Name). Our executeIndex function looks like this:
public function executeIndex(sfWebRequest $request)
{
$pu = new PagingUtility("Category", $this->getUser());
$items_x_page = sfConfig::get('app_max_items_x_page');
$this->pager = $pu->buildPager($request, $items_x_page);

$this->sort = $pu->getSort();

//Adding SortableHeaders
$this->form = new sfForm();
$this->form->setWidget('code_sorted',
new maSortableHeader(array('fieldname'=>'code',
'fieldlabel'=>'Code', 'routename'=>'@category','sort'=>$pu->getSort())));
$this->form->setWidget('name_sorted',
new maSortableHeader(array('fieldname'=>'Name',
'fieldlabel'=>'Name', 'routename'=>'@category','sort'=>$pu->getSort())));

}
You still need to get the asc.png and desc.png into your web/images folder for the widget to show icon besides the header.

Editing the indexSuccess.php
What we need to do now is show the Sortable Headers, change the default loop to use the pager, add the pagination control and the pagination info partials.
<thead>
<tr>
<th><?php echo $form['code_sorted']; ?></th>
<th><?php echo $form['name_sorted']; ?></th>
<th>Description</th>
<th>Created at</th>
<th>Updated at</th>
<th>Created by</th>
<th>Updated by</th>
</tr>
</thead>
<tbody>
<?php foreach ($pager->getResults() as $i => $category): ?>
<tr>
<td><a href="<?php echo url_for('category/edit?id='.$category->getId()) ?>"><?php echo $category->getCode() ?></a></td>
<td><?php echo $category->getName() ?></td>
<td><?php echo $category->getDescription() ?></td>
<td><?php echo $category->getCreatedAt() ?></td>
<td><?php echo $category->getUpdatedAt() ?></td>
<td><?php echo $category->getCreator() ?></td>
<td><?php echo $category->getUpdator() ?></td>
</tr>
<?php endforeach; ?>
</tbody>
<tfoot>
<tr>
<td colspan="7">
<?php include_partial('global/pagination_info', array('pager' => $pager)) ?>
<?php include_partial('global/pagination_control', array('pager' => $pager, 'module' => 'category')) ?>
</td>
</tr>

Editing the Routing.yml
This is the step I always forget. Mainly because I don't quite undertand what it does. I will look into it an post my findings. For now it will not work unless you add the follwing code to your routing.yml.
category:
class: sfDoctrineRouteCollection
options:
model: Category
module: category
prefix_path: /category
column: id
with_wildcard_routes: true

jueves, 3 de marzo de 2011

QR Codes a Cool Way to Share Data

I recently discovered QR Codes. QR Codes (QR is short for Quick Read) were created by Denso-Wave a subsidiary of Toyota. They are a type of barcode that can be read by both barcode readers and smartphones with cameras. This is my blogs url encoded in QR Code:

These codes are being used extensively in advertising and even in games. But the thing I like the most is there are several QR code generator online.

The jewel of the crown is that a QR Code are set down in the ISO-18004 standard so they are the same all over the world.

QR Code Online Generators

There are several online QR Code Generators. The followings are the ones I took a peek at:

  1. I found Kaywa QR Code to be very good.

  2. QR Code Generator from the ZXing Project: Is based on the Googles Chart API and has more types of contents for example has a WIFI Network format. It also has a geo location format which is great.

    This the URL for the Biodiversity Museum in Panama.
  3. QRStuff : has more data types than XZing Project but my QR reader doesn't work with all of them. I create a QR a code for an email message and even though the reader read it, I got an error when I tried to send the email. I like this QR generator site because it has a lot of information on QR codes.
Now if you're sort of a nerd (like me) you are probable thinking how to embed the online creators into your own application. The coolest thing about QR codes it's that they are supported the Google Chart API. For example to create a QR code to encode the phrase Hola Panama (Hello Panama) all you have to do is build an URL like this one:

http://chart.apis.google.com/chart?cht=qr&chs=350x350&chl=Hola+Panama

You'll get a QR code like this


QR Code Reader

Since I have Blackberry I just focused on readers for BBs. But you can find readers for iPhone, Android and certain versions of Nokias OSs. I found a list of barcode readers can be found at http://www.mobile-barcodes.com/qr-code-software/blackberry/.
I chose i-nigma only because it supported many other phones aside from Blackberry. Once installed it has been working great.

miércoles, 19 de enero de 2011

Working with Microsoft SQL Server 2008 and Symfony without sa Login

On a previous post Running Symfony 1.4 with MS SQL Server 2008 I described how to connect to MS SQL Server 2008 using Symfony 1.4.8.
I did all my tests using the sa (superadmin) login and SQL Server Express 2008 R2. I figured once I had my model stable enough all I would have to do would be create a new login and work with it. As usual I was sorely mistaken. The problem is that to operate on a database you need to create a user (in the database) to give it permissions to do things like create table or create data. When you drop the database (for example while running a symfony doctrine:build --all) you eliminate the user, and the login resets to the dbo user. After the database is recreated there is no user associate to the current login and you can’t do anything.
Working with sa on a development environment is not a very good idea, but using it in a production environment is even worst. I found a work around not to use sa as login, not a very elegant one, but it works. The permissions and roles I’am giving the login and user are probably overkill but I need to make this work sooner than later so if you´re going to a production environment I would suggest to take a closer look a the permissions.

Creating the Database


Open Microsoft SQL Server Management Studio and connect to the Instance using sa or other administrative login.
Right click on Databases and select New Database... Create a new database called sfex_db and choose as owner a default for now.

Creating an Administrative Login

Create a Login. Right click on MYMachine\SQLEXPRESS\Security\Logins select New Login. Use as Login name sfex_salogin, assign a password and select as Default database sfex_db.

On Server Roles add the following:


Select the User Mappings page select sfex_db change the user to sfex_sauser and leave the default schema blank. I tried creating a schema an assigning it as the default schema to the user but it will still create the tables in the dbo schema. I´m still trying to figure out how to change the default schema to something else than dbo.
Assign the role membership as shown:

In Your Symfony Project

After you have created the database, the login and the user you will be able to use the database with Symfony.
symfony doctrine:build --all-classes --model --forms --filters --sql
symfony doctrine:insert-sql
symfony doctrine:data-load

But what happens if you make changes to your schema. You cannot run the insert-sql task because the tables already exist. You´ll have to use the create-model-tables task. The inconvenience with this is that you have to explicitly tell the task what model tables to recreate; this is kind of a hassle. I’m currently working in a way to create the equivalent task to doctrine: build --all for MS SQL Server, as soon as I´ve a working task I´ll post it.
symfony doctrine:build --all-classes --model --forms --filters --sql
symfony doctrine:create-model-tables User Phone
symfony doctrine:data-load