Symfony es un framework muy poderoso que apenas estoy empezando a aprender a utilizar. Sin embargo dentro de la documentación no encontré un buen ejemplo de como guardad una imagen en la base de datos como un BLOB y como recuperarla para despliegue.
Después de algo de investigación encontré un excelente posting en un forum del Symfony titulado How to upload an Image to a DB under Symfony 1.4 & display image to an end user por René Kabis donde explicaban como cargar y desplegar las imágenes en un BLOB.
El problema que tuve no era con el posting si no con mi falta de experiencia con Symfony. El posting asume que el usuario tiene al menos experiencia básica con Symfony, asi que decidí crear un guía un poco más detallada.
Creando el Proyecto sfMapGallery
- Abra Netbeans y vaya a Menu>New Project...
- Seleccione PHP Application y haga clic en Next
- Tecle el como Project Name sfMapGallery y haga clic en Next
- Cambie el Project URL a http://localhost:9091/ y haga clic en Next este paso asume que su configuración en Apache es en esta dirección
- Seleccione Symfony PHP Framework y haga clic en Finish


Creando la Base de Datos
Por defecto se crea el archivo Sources Files\config\databases.yml el mismo debe verse como este:
all:
 doctrine:
   class: sfDoctrineDatabase
   param:
     dsn:      mysql:host=localhost;dbname=sfMapGallery
     username: root
     password:
A continuación crearemos una base de de datos con el nombre mapgallery.
- Edite el archivo Sources Files\config\databases.yml y cambie el dbname por mapgallery
dsn: mysql:host=localhost;dbname=mapgallery
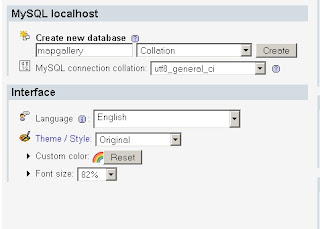
- Abra phpMyAdmin (con WAMP el url es http://localhost/phpmyadmin/) y cree una nueva base de datos con el nombre mapgallery
- Copie el siguiente contenido en el archivo Sources Files\config\doctrine\schema.yml
Map:
 tableName: maps
 connection: doctrine
 actAs: [Timestampable]
 options:
   type: INNODB
   collate: utf8_unicode_ci
   charset: utf8
 columns:
   id:
     type: integer(4)
     primary: true
     autoincrement: true
   filename:
     type: string(50)
   image:
     type: blob
   tags:
type: string(150) - Corra el comando symfony doctrine:build --all --no-confirmation . Este comando debe crear la tabla en la base de datos y el modelos, las formas y los filtros en Sources Files\lib

Creando el Validador de Imágenes
- Cree el directorio Sources Files\lib\validator
- Copy el archivo <Directorio Instalación Symfony>\lib\validator\sfValidatorFile.class.php
- Renombre el archivo Sources Files\lib\validator\sfValidatorFile.class.php a sfValidatorImgToDB.class.php
- Abra el archivo sfValidatorImgToDB.class.php y :
- Cambie el nombre de la clase a sfValidatorImgToDB
...
class sfValidatorImgToDB extends sfValidatorBase {
... - En el método configure adicione la opcion resolution (aprox. linea 75) y comente las optiones validated_file_class y path.
...
       $this->addOption('mime_categories', array(
               'web_images' => array(
                       'image/jpeg',
                       'image/pjpeg',
                       'image/png',
                       'image/x-png',
                       'image/gif',
       )));
       $this->addOption('resolution');
       //$this->addOption('validated_file_class', 'sfValidatedFile');
       //$this->addOption('path', null);
       $this->addMessage('max_size', 'File is too large (maximum is %max_size% bytes).');
... - En el método doClean comente las dos últimas lineas e inserte el código mostrado
...
       if ($this->hasOption('mime_types')) {
           $mimeTypes = is_array($this->getOption('mime_types')) ? $this->getOption('mime_types') : $this->getMimeTypesFromCategory($this->getOption('mime_types'));
           if (!in_array($mimeType, array_map('strtolower', $mimeTypes))) {
               throw new sfValidatorError($this, 'mime_types', array('mime_types' => $mimeTypes, 'mime_type' => $mimeType));
           }
       }

       //$class = $this->getOption('validated_file_class');
       //return new $class($value['name'], $mimeType, $value['tmp_name'], $value['size'], $this->getOption('path'));

       // check resolution

       if ($this->hasOption('resolution')) {
          $resolution = (is_array($this->getOption('resolution')) && count($this->getOption('resolution'))==2) ? $this->getOption('resolution') : null;
           if (is_int($resolution[0]) && is_int($resolution[1]) && ($resolution[0]/$resolution[1] == 4/3)) {
               $width = $resolution[0];
               $height = $resolution [1];
           }else {
               $width = 1024;
               $width = 768;
               $ratio = 4/3;
           }
       }

       return base64_encode($this->catchImage($value['tmp_name'], $width, $height));    }

... - Después del metodo doClean agregue los metodos catchImage y resizeImage
...
    public function catchImage($image, $width, $height) {
       if($image) {
           $data=fread(fopen($image, "r"), filesize($image));
           unlink($image);
           return $this->resizeImage(imagecreatefromstring($data), $width, $height);
       }
   }

   public function resizeImage($image, $width, $height) {
       $old_width = imagesx($image);
       $old_height = imagesy($image);
       $ratio=$old_width/$old_height;
       $resized_img = imagecreatetruecolor($width,$height);
       $white = imagecolorallocate($resized_img, 255, 255, 255);
       imagefill($resized_img, 0, 0, $white);
       if($ratio>(4/3)) {
           $new_width=$width;
           $new_height=($width*($old_height/$old_width));
           $x_offset=0;
           $y_offset=(($height-$new_height)/2);
       }elseif($ratio<(4/3)) {             $new_width=($height*($old_width/$old_height));             $new_height=$height;             $x_offset=(($width-$new_width)/2);             $y_offset=0;         }else {             $new_width=$width;             $new_height=$height;             $x_offset=0;             $y_offset=0;         }         imagecopyresampled($resized_img, $image, $x_offset, $y_offset, 0, 0, $new_width, $new_height, $old_width, $old_height);         ob_start();         imageJPEG($resized_img);         $new_image = ob_get_contents();         ob_end_clean();         return $new_image;     }
... - Guarde el archivo
- Cambie el nombre de la clase a sfValidatorImgToDB
- Abra el archivo Sources Files\lib\form\doctrine\MapForm.class.php y agreue el siguiente código en el método configure.
class MapForm extends BaseMapForm
{
 public function configure()
 {
     $this->setWidgets(array(
     'id'         => new sfWidgetFormInputHidden(),
     'filename'   => new sfWidgetFormInputText(),
     'image'      => new sfWidgetFormInputFileEditable(array('label'=>'Map', 'file_src'=>'', 'is_image'=>true, 'edit_mode'=>!$this->isNew(),'template'=>'%input%')),
     'tags'       => new sfWidgetFormInputText(),
     'created_at' => new sfWidgetFormDateTime(),
     'updated_at' => new sfWidgetFormDateTime(),
   ));

   $this->setValidators(array(
     'id'         => new sfValidatorDoctrineChoice(array('model' => $this->getModelName(), 'column' => 'id', 'required' => false)),
     'filename'   => new sfValidatorString(array('max_length' => 50, 'required' => false)),
     'image'      => new sfValidatorImgToDB(array('resolution'=>array(1024, 768), 'mime_types'=>array('image/jpeg', 'image/jpg', 'image/pjpeg'), 'required'=>true)),
     'tags'       => new sfValidatorString(array('max_length' => 150, 'required' => false)),
     'created_at' => new sfValidatorDateTime(),
     'updated_at' => new sfValidatorDateTime(),
   ));

   $this->widgetSchema->setNameFormat('map[%s]');

   $this->errorSchema = new sfValidatorErrorSchema($this->validatorSchema);  }
}
Probando el Validador
- Corra el commando symfony doctrine:generate-module --with-show frontend maps Map
- Abra la dirección http://localhost:9091/frontend_dev.php/maps


Desplegando la Imagen
- Corra el comando symfony generate:module frontend image. Esto creará la carpeta image en Source Files\apps\frontend\modules.
- Abra el archivo Source Files\apps\frontend\modules\templates\indexSuccess.php agregue el siguiente código
<?php echo $image; ?>
- Abra el archivo Source Files\apps\frontend\modules\image\actions\actions.class.php reemplaze el código del método executeIndex por el siquiente:
...

 public function executeIndex(sfWebRequest $request) {
       $idreq = $request->getParameter('id');
       $data = Doctrine::getTable('Map')->find($idreq)->getData();
       $this->image = base64_decode($data["image"]);
       sfConfig::set('sf_web_debug', false);
       sfConfig::set('sf_escaping_strategy', false);    }
... - Cree el directorio Source Files\apps\frontend\modules\image\config
- Cree el archivo Source Files\apps\frontend\modules\image\config\view.yml, agregue el siguiente contenido al archivo:
indexSuccess:
 has_layout: false
 http_metas:
   content-type: image/jpeg
downloadSuccess:
 has_layout: false
 http_metas:
content-type: image/jpeg - Abra el archivo Source Files\apps\frontend\config\routing.yml , y agregue el siguiente código antes del registro default:
...
default_index:
 url:   /:module
 param: { action: index }
image_handler:
 url:  /image/:id/*
 class:   sfRoute
 options:
   model: Photo
   type:  object
 param: { module: image, action: index }
 requirements:
   id: \d+
   sf_method: [GET]
default:
url: /:module/:action/* - Abra el archivo Source Files\apps\frontend\modules\photo\templates\indexSuccess.php y cambie el codigo que despliega la imagen:
...
     <td><?php echo $map->getFilename() ?></td>
      <td><img src="<?php  echo url_for('@default?module=image&action=index&id='.$map->getId())  ?>" height="100px"/> </td>
     <td><?php echo $map->getTags() ?></td>
...

No hay comentarios:
Publicar un comentario