Somewhere along the evolution of ArcGIS the Least Cost Path tool was eliminated from the Spatial Analyst Toolbar (as many other tools). I had not noticed this until recently, when I was preparing a class.
So I decided to create this tutorial in YouTube to help me and other remember how to create a simple least cost path using ArcToolbox.
martes, 13 de marzo de 2012
jueves, 19 de enero de 2012
My First RESTful Web Service with Symfony2 (Pagination) Part II
On the first part My First RESTful Web Service with Symfony2 Part I. I discussed how to create a simple restful web service using JSON. I mainly focused on how to create the Symfony2 project and make it respond to json call.
On this post I´ll discuss how to make the web service paginate and create a simple interface to display the results using jQuery.
1 Changing the MRoute Repository
On Part I we laid the ground for pagination on the repository but didn´t work out the details.
What we're going to do is make pagination work and add the getCount method that will return the count of MRoutes on the database.
- Open srcMyGISGISBundleEntityMRouteRepository.php.
- Replace the previous getMRoutes method with the following. The previous code had a bug on the order by lines.
public function getMRoutes($order_by = array(), $offset = 0, $limit = 0) { //Create query builder for languages table $qb = $this->createQueryBuilder('m'); //Show all if offset and limit not set, also show all when limit is 0 if ((isset($offset)) && (isset($limit))) { if ($limit > 0) { $qb->setFirstResult($offset); $qb->setMaxResults($limit); } //else we want to display all items on one page } //Adding defined sorting parameters from variable into query if (isset($order_by)) { foreach ($order_by as $key => $value) { $qb->add('orderBy', 'm.' . $key . ' ' . $value); } } //Get our query $q = $qb->getQuery(); //Return result return $q->getResult(); } - On the same class add the following method:
public function getCount() {
    $query = $this->createQueryBuilder('m')
            ->select('COUNT(m.id)')
            ->getQuery();
    return  $query->getSingleScalarResult();
}
2 Changing the MRoute Controller
There are four things we need to do to the contoller. Read the count of MRoutes from the repository, Order the MRoutes by id, calculate the offset and define the routes.
- Open srcMyGISGISBundleControllerMRouteController.php.
- Replace the previuos routingInfoAction method with the following code:
/**
 * Gets paged MRoutes JSON objects.
 * @Route("/routing-info/info.json",
 *     defaults ={"page" = 1, "count" = 10},
 *     name="mroute_json_list2")
 * @Route("/routing-info/{page}/{count}/info.json",
 *     requirements = {"page" = "\d+", "count" = "\d+"},
 *     defaults ={"page" = 1, "count" = 10},
 *     name="mroute_json_list")
 * @Method("get")
 */
public function routingInfoAction($page, $count) {
    $offset = ($page - 1) * $count;

    $em = $this->getDoctrine()->getEntityManager();
     $total = $em->getRepository('MyGISGISBundle:MRoute')->getCount();

    $mroutes = $em->getRepository('MyGISGISBundle:MRoute')->getMRoutes(array('id' => 'ASC'), $offset, $count);
    $r_array = $this->routes2Array($mroutes);
    $r = array('page' => $page, 'count' => $count, 'total' => $total,'routes' => $r_array);
    return new Response(json_encode($r));
}
Now the web service will respond to http://localhost/mroute-rest-service/web/app_dev.php/mroute/routing-info/info.json using route mroute_json_list2 and will respond to http://localhost/mroute-rest-service/web/app_dev.php/mroute/routing-info/2/10/info.json will respond to route mroute_json_list.
Now we´re ready to consume the service.
3 Consuming the Web Service
Since I'm a little green using Twig what I did was create a new Netbeans PHP project and add on the index.html the following code:
<html>
   <head>
       <title></title>
       <meta http-equiv="Content-Type" content="text/html; charset=UTF-8">
       <script type="text/javascript" src="../js/jquery-1.6.4.min.js"></script>
        <link rel="stylesheet" type="text/css" href="../css/routing2.css" media="screen">
       <style>
           .page-link{
               margin: 0.2em;
               padding: 0.2em 0.5em;
               background-color: #1c94c4;
           }
           .page-link.selected{
               color: white;
               background-color: #005B81;

           }
           .page-link:hover{
               cursor: pointer;
           }
           .coordinates{
               height: 30px;
           }
       </style>
       <script type="text/javascript" >
           function roundNumber(rnum, rlength) { // Arguments: number to round, number of decimal places
               var newnumber = Math.round(rnum * Math.pow(10, rlength)) / Math.pow(10, rlength);
               if(rnum % 1)
                   return newnumber;
           }
           function showData(page, count){
               $('#routes').empty();
               $('#routes').html('<span class="loading">Loading ' + count + ' records for page ' + page +'...</span>');
               var baseUrl ='http://localhost/mroute-rest-service/web/app_dev.php/mroute/routing-info/'
                   + page + '/' + count +'/info.json' ;
               $.ajax({
                   url      : baseUrl,
                   dataType : 'json',
                   success  : function(data){
                        $('#routes').empty();
                       $.each(data.routes, function(i,route){
                           var li = $("<div/>").attr("id","route-" + route.id);
                           li.html(route.name);
                           $.each(route.points, function(i,point){
                               if(point.ptype == 'STOP'){
                                   var num = i +1;
                                   var className = 'stop-0' + num
                               }
                               var pointDiv   = $("<div/>").attr("id","point-" + point.id);
                               pointDiv.addClass('coordinates');
                               pointDiv.html('<span class="' + className + '" style= "float:left;"></span>' +point.x + ', ' + point.y);
                               li.append(pointDiv);
                           });
                           $('#routes').append(li);
                       });
                       var pagingDiv = $("<div/>").attr("id","paging-info");
                       pagingDiv.html('Page ' + data.page + ' count: ' + data.count+ ' total: ' + data.total + '<br/>');
                       var m = Math.ceil(data.total / data.count);
                       for(i =1; i <= m; i++){
                           var pageLink = $("<span/>").attr({"id" : "page-link-"+i, 'class' : 'page-link'}).html(i);
                           if(i == page){
                               pageLink.addClass('selected');
                           }
                           pageLink.bind('click',{'page': i}, onClickLink);

                           pageLink.appendTo(pagingDiv);
                       }
                       $('#routes').append(pagingDiv);
                   }});


           }
           function onClickLink(event){
               //alert(event.data.page);
               showData(event.data.page, 10);
           }

           $(document).ready(function(){
               showData(1,10);
           });

       </script>
   </head>
   <body>
       <div>
           <div id="routes"></div>
       </div>
   </body>
</html>
Now you´re able to consume the web service.
viernes, 13 de enero de 2012
My First RESTful Web Service with Symfony2 Part I
Contents
I want to create a simple Resftul Web service for reading data in JSON format. On part I I´ll discuss the basics on how to configure the web service on part II I´ll discuss how to introduce pagination to the web service.
Requirements:
- PHP 5.3.6
- Netbeans 7.0.1
- Wamp 2.0
1 Installing Symfony2
- Download Symfony2 in zip format from http://symfony.com/download.
- Unzip the file. To your NetbeansProjects directory,
- Rename the symfony directory to mroute_rest_service.
- Open a command Window and move to the mroute_rest_service.directory.
Run:
php .\app\console --version
Symfony version 2.0.9 - app/dev/debug
2 Creating the Bundle
- On the command window run:
php .\app\console generate:bundle
Welcome to the Symfony2 bundle generator

Your application code must be written in bundles. This command helps
you generate them easily.

Each bundle is hosted under a namespace (like Acme/Bundle/BlogBundle).
The namespace should begin with a "vendor" name like your company name, your
project name, or your client name, followed by one or more optional category
sub-namespaces, and it should end with the bundle name itself
(which must have Bundle as a suffix).

Use / instead of \ for the namespace delimiter to avoid any problem.
- Fill as follows:
Bundle namespace: MyGIS/GISBundle

In your code, a bundle is often referenced by its name. It can be the
concatenation of all namespace parts but it's really up to you to come
up with a unique name (a good practice is to start with the vendor name).
Based on the namespace, we suggest MyGISGISBundle.

Bundle name [MyGISGISBundle]:

The bundle can be generated anywhere. The suggested default directory uses
the standard conventions.

Target directory [C:\NetbeansProjects\gis_rest_services/src]:

Determine the format to use for the generated configuration.

Configuration format (yml, xml, php, or annotation) [annotation]:

To help you getting started faster, the command can generate some
code snippets for you.

Do you want to generate the whole directory structure [no]?

Summary before generation

You are going to generate a "MyGIS\GISBundle\MyGISGISBundle" bundle
in "C:\NetbeansProjects\gis_rest_services/src/" using the "annotation" format.

Do you confirm generation [yes]?

Bundle generation


Generating the bundle code: OK
Checking that the bundle is autoloaded: OK
Confirm automatic update of your Kernel [yes]?
Enabling the bundle inside the Kernel: OK
Confirm automatic update of the Routing [yes]?
Importing the bundle routing resource: OK


You can now start using the generated code!
3 Generating Doctrine Entities
We are going to to have two entities Route and Points.
- On the command window run:
php .\app\console gen:doctrine:entity
- On Entity shortcut name type MyGISGISBundle:MRoute
- Accept defualt configuration format annotation
- Add the fields as follows:
- Name
Field name: name
Field type: string
Field length: 125
- Name
- On Do you want to generate an empty repository class answer yes
- On the command window run:
php .\app\console gen:doctrine:entity
- On Entity shortcut name type MyGISGISBundle:Point
- Accept defualt configuration format annotation
- Add the fields as follows:
- Name
Field name: name
Field type: string
Field length: 50
- X
Field name: x
Field type: decimal
- Y
Field name: y
Field type: decimal
- PType
Field name: pType
Field type: string
Field length: 25
- Name
- On Do you want to generate an empty repository class answer yes
4 Opening the Project with Netbeans
Open Netbeans.
- Select File\New Project
- Select PHP Application with Existing Sources.
- Click Next.
- On the New PHP Application with Existing Sources
- Select the source folder where you unzipped the Symfony framework (C:\NetbeansProjects\mroute_rest_service).
- Select PHP Version: 5.3
- Click Next
- Click Finish.
5 Connecting to the Database
5.1 Connection Parameters
On Netbeans open C:\NetbeansProjectsmroute_rest_service\app\config\parameters.ini.
Edit the connection parameters as shown:
[parameters]
   database_driver   = pdo_mysql
   database_host     = localhost
   database_port     =
   database_name     = gisroutes
   database_user     = root
   database_password =
5.2 Making the One to Many Relationship work on the Entities
I had to figure out how to se the relationship using annotations. I found an example in XML and adapted it [1]. Another thing I found out was that I had to manually set the precision and scale of the decimal fields.
- Edit the Point.php and add the route
/**
 * @ORM\ManyToOne(targetEntity="MRoute", inversedBy="points")
 */
 private $route;

... - On the Point.php edit the $x adn $y Column definitio to add precision and scale as show:
/**
 * @var decimal $x
 *
 * @ORM\Column(name="x", type="decimal", precision=10, scale=3)
 */
private $x;

/**
 * @var decimal $y
 *
 * @ORM\Column(name="y", type="decimal", precision=10, scale=3)
 */
private $y; - Edit the MRoute.php and add the points
use Doctrine\Common\Collections\ArrayCollection;
...
class Route {
...

/**
 * @ORM\OneToMany(targetEntity="Point", mappedBy="route")
 * @var ArrayCollection $points
 */
private $points;

...

public function __construct() {git

    $this->points = new ArrayCollection;
}

... - I found this cool hay to generate getters and setters [2]. The following command will create the getters and setters for the Point and Route entities.
php appconsole doctrine:generate:entities MyGISGISBundleEntity
5.3 Creating the Database and Tables
To create the database run:
php app/console doctrine:database:create
To create the tables run:
php app/console doctrine:schema:update --force
5.4 Generating CRUD Controllers and Templates (Optional)
As far as the web service is concerned you don´t need t create the CRUD controllers. I´m creating them to add data.
- On the command window run:
php .\app\console doctrine:generate:crud
- Fill like this:
The Entity shortcut name: MyGISGISBundle:MRoute
Do you want to generate the "write" actions [no]? yes
Configuration format (yml, xml, php, or annotation) [annotation]:
Routes prefix [/mroute]:
Do you confirm generation [yes]?
Confirm automatic update of the Routing [yes]?
Now we are ready to make our first test.
5.5 Viewing the Data on Apache
On Wamp´s Apache create an alias names route-rest-service pointing to C:\NetbeansProjects\mroute_rest_service.
Open a brower http://localhost/mroute-rest-service/web/app_dev.php/mroute/
6 Creating a RestFul Web Service
I found an example on how to configure the routing usting yml [3] and I adapted it to annotations.
What we want is to get a list of routes with their points in json format.
First thing we need to do is add a method that will fetch the entities from the database. The following code includes the pagination concept wich we will discuss on Part II.
- Open src\MyGIS\GISBundle\Entity\MRouteRepository.php
- Add the following code whitin the class
public function getMRoutes($order_by = array(), $offset = 0, $limit = 0) {
    //Create query builder for languages table
    $qb = $this->createQueryBuilder('m');
    //Show all if offset and limit not set, also show all when limit is 0
    if ((isset($offset)) && (isset($limit))) {
        if ($limit > 0) {
            $qb->setFirstResult($offset);
            $qb->setMaxResults($limit);
        }
        //else we want to display all items on one page
    }
    //Adding defined sorting parameters from variable into query
    if (isset($order_by)) {
        foreach ($order_by as $key => $value) {
            $qb->add('orderBy', 'l.' . $key . ' ' . $value);
        }
    }
    //Get our query
    $q = $qb->getQuery();
    //Return result
    return $q->getResult();
} - Open src\MyGIS\GISBundle\Controller\MRouteController.php
- Add the following code:
/**
 * Deletes a MRoute entity.
 *
 * @Route("/routing-info/info.json", name="mroute_json_list")
 * @Method("get")
 */
public function routingInfoAction() {
    $page = 1;

    $count = 25;
    $em = $this->getDoctrine()->getEntityManager();
    $mroutes  = $em->getRepository('MyGISGISBundle:MRoute')->getMRoutes();
    $r_array = $this->routes2Array($mroutes);
    $r = array('page' => $page, 'count' => $count, 'routes' => $r_array);
    return new Response(json_encode($r));
}

private function routes2Array($routes){
    $routes_array = array();

    foreach ($routes as $route) {
        $points_array = array();
       foreach ($route->getPoints() as $point){
           $p_array = array('id' => $point->getId(), 'name' => $point->getName(),
               'x' => $point->getX(),'y' => $point->getY(), 'ptype' => $point->getPType());
           $points_array[] = $p_array;
       }
       $r_array = array('id' => $route->getId(), 'name' => $route->getName(), 'points' => $points_array);
       $routes_array[] = $r_array;
    }
    return $routes_array;
} - You´ll have to add some data to the se the web service working. Since I haven´t figured out how to install the FixtureBundle from behind a proxy I add the data via sql using phpMyAdmin. Use the SQL in https://gist.github.com/1594781 to add data.
- Run http://localhost/mroute-rest-service/web/app_dev.php/mroute/routing-info/info.json from your browser and voila it works!!
7 References
| [1] |
| [2] | Databases and Doctrine ("The Model") http://symfony.com/doc/current/book/doctrine.html |
| [3] | Routing http://symfpony-project.org/ |
domingo, 1 de enero de 2012
Using restructuredtext in Blogger
Note
Updated 2012-0109: Added capability to clean_white_spaces.py to accept parameters
When I first blogged about restructuredText [1] I thought I had found a cool way to use TextMate for blogging.
My workflow was:
- Type the post in TextMate in restructuredText format.
- Run rst2thml.
- Open the html file
- Copy the tags inside <body> tag to Blogger.
- Edit the post in blogger to eliminate the white spaces.
This is not so bad. Until I wanted to update a rather long post I had. I realized that I would have to redo all my steps.
I had read about rst2wp which is a tool to convert to WordPress [2] and found out someone had adapted a script for blogger [3].
Installing rst2bs
These are the step I took to install rst2bs in my Mac with Lion Os X.
- Download the script from http://gitorious.org/mles/mles/trees/master by click on Download master as tar.gz
- Double click on mles-mles-master.tar.gz.
- Open terminal and run the following commands:
sudo cp ~/Downloads/mles-mles/rst2bs.py /usr/local/bin/
chmod 755 /usr/local/bin/rst2bs.py
- Test it
rst2bs.py installing_pygments.rst installing_pygments_bs.html
Eliminating White Spaces
For that I wrote a simple Python script. Please bare in mind that my Python skill are almost non existent.
My clean_white_spaces.py reads:
import sys;

fd = open(sys.argv[1])
contents = fd.readlines()
fd.close()
new_contents = []

of = open(sys.argv[2], "w")
print "Eliminanting white spaces from " + sys.argv[1] + " to " + sys.argv[2]
# Get rid of empty lines
pre = False
line_num = 0
for line in contents:
    line_num += 1
    find_open_pre = "<pre>" in line
    find_close_pre = "</pre>" in line
    if find_open_pre:
        print "PRE FOUND OPEN " + str(line_num)
        pre = True
    if find_close_pre:
            print "PRE FOUND CLOSE " + str(line_num)
            pre = False
    if not pre:
        # Strip whitespace, should leave nothing if empty line was just "\n"
        if not line.strip():
            continue
        # We got something, save it
        else:
            new_contents.append(line.rstrip('\n'))
    else:
        new_contents.append(line)
of.writelines(new_contents)
of.close

# Print file sans empty lines
#print "".join(new_contents)
print "Finished"
This script will strip the white spaces if they are not within a <pre> tag.
Run it with the html generated by rst4bs.
python clean_white_spaces.py installing_pygments_bs.html installing_pygments_bs_clean.html
References
| [1] | Installing restructuredText Bundle for TextMate http://tecnofuenteabierta.blogspot.com/2011/12/installing-restructuredtext-bundle-for.html |
| [2] | Using ReStructured Text with WordPress http://blog.mafr.de/2008/03/22/using-rst-with-wordpress/ |
| [3] | Some Twist on the Blog http://grissiom.blogspot.com/2009/12/some-twist-on-blog.html |
jueves, 29 de diciembre de 2011
Configuring Mac Lion for Symfony2 Development
Contents
1 Setting up Apache
1.1 Turning Web Sharing On
1.2 Activate the PHP Module on Apache

2.1 Installing MySQL Community Server 5.5.19
3 Creating a Quick Symfony2 Project to Test Configuration
Enjoy!!
When I first started with Symfony 1.4.x in Snow Leopard I installed XAMPP and it worked fine.
I recently discovered that Lion OsX comes with Apache and PHP installed [1] , so all I'm missing is MySQL and phpMyAdmin and I'm set.
1 Setting up Apache
1.1 Turning Web Sharing On
- Open System Preferences
- Click on Sharing on Internet & Wireless.
- Turn On Web Sharing
1.2 Activate the PHP Module on Apache
Open Terminal
Type:
sudo mate /private/etc/apache2/httpd.conf
Search for php5_module and uncomment it (eliminate the #).
The content will look like this:
LoadModule alias_module libexec/apache2/mod_alias.so
LoadModule rewrite_module libexec/apache2/mod_rewrite.so
LoadModule php5_module libexec/apache2/libphp5.so

#Apple specific modules
LoadModule apple_userdir_module libexec/apache2/mod_userdir_apple.so
Save the file.
Now you must restart Apache, on Terminal type:
sudo apachectl restart
1.3 Testing Apache Configuration
Open a Web browsert and type inth address bar http://localhost.
You should get a page that reads:
It works!
1.4 Setting the Time Zone on php.ini
All the following operations require sudo
Copy the file /etc/php.ini.default to /etc/php.ini
Open the /etc/php.ini and set the correct time zone.
My timezone is Panama.date.timezone = AMERICA/PANAMA
1.5 Testing the PHP works with PHP
Open Terminal and type:
cd /Library/WebServer/Documents/
Type:
sudo touch test.php
Type:
sudo mate test.php
On Textmate add the following code
<?php phpinfo(); ?>
- Save the file.
Open a Web browsert and type inth address bar http://localhost/test.php.

2 Installing and Configuring MySQL
2.1 Installing MySQL Community Server 5.5.19
- Download the Mac OS X ver. 10.6 (x86, 64-bit), DMG Archive from Download MySQL Community Server.
- Double click on the mysql-5.5.19-osx10.6-x86_64.dmg file to open and mount the dmg.
- Double click on the mysql-5.5.19-osx10.6-x86_64.pkg file.
- Follow the installer and accept all the default values. It will ask you for your master
password.
Warning
/usr/local/mysql is only symlink to /usr/local/mysql-5.5.19-osx10.6-x86_64 which means when you upgrade to new
version symlink will be changed to point to new version but won’t be deleting the older version. However you
need to copy your data directory to new location to make sure your existing databases are intact post upgrade [2].
2.2 Installing the Startup Scritps
You can startup mysql by going to Terminal and typing “/usr/local/mysql/bin/mysqld_safe &”.
We are going to install the startup scrips so we'll be able to start/stop mysql from
System Preferences.
- Double click on MySQLStartupItem.pkg and follow on screen instructions.
- Double click MySQL.prefPane which will add MySQL to OS X System Preferences.
- Select Install for all users of this computer.
- Select Automatically Start MySQL Server on Startup
2.3 Installing Sequel Pro
I was going to install phpMyAdmin but read an article that mentioned Sequel Pro [3] so I decided to try it out.
- Download Sequel Pro 0.9.9.1 from http://www.sequelpro.com/download/
- Double click on Sequel_Pro_0.9.9.1.dmg to open it.
- Drag and drop the Sequel Pro icon to your Applications folder.
- Double click the Sequel Pro icon.
- For Host type 127.0.0.1
- For Username type root.
- For Password leave blank.
2.4 Configure mysql.sock
Now we need to create a symlink for PHP to be able to access the mysql.sock. Trouble is if you try it you’ll get an error because /var/mysql doesn’t exist [4].
From terminal, run:
sudo find / -name mysql.sock -print
The installer installed the sock in /private/tmp/mysql.sock
Run
sudo mkdir /var/mysql
Run
sudo ln -s /private/tmp/mysql.sock /var/mysql/mysql.sock
3 Creating a Quick Symfony2 Project to Test Configuration
3.1 Installing Symfony2
Download Symfony2 on zip format.
Unzip the file Symfony_Standard_Vendors_2.0.8.zip to your working directory.
Rename the symfony directory to lion_test
Open a Terminal and move to the lion_test directory.
Run:php ./app/console --version
Symfony version 2.0.8 - app/dev/debug
3.2 Creating a Bundle
On terminal run php ./app/console generate:bundle name the Bundle namespace LionTest/PeopleBundle.
Accept all defaults values except Do you want to generate the whole directory structure answer yes.
3.3 Generating Doctrine Entities
On terminal run php ./app/console gen:doctrine:entity. Create an entity with the Shortcut name
LionTestPeopleBundle:People. Use the following data for the columns
| Column | Type | Size |
|---|---|---|
| last_name | string | 80 |
| first_name | string | 80 |
| date_of_birth | date | |
| dob_fuzzyness | integer |
Accept values for defaul except on Do you want to generate an empty repository class answer yes.
3.4 Connecting to the Database
3.4.1 Connection Parameters
Open /lion_test/app/config/parameters.ini and change the database to people.
[parameters]
database_driver   = pdo_mysql
database_host     = localhost
database_port     =
database_name     = people
database_user     = root
database_password =
3.4.2 Generating CRUD Controllers and Templates
On terminal run php ./app/console doctrine:generate:crud create a the crud forms for
LionTestPeopleBundle:People create the write actions.
3.5 Configuring Apache to access your Symfony2 Site
Since the purpose of this entry is configure your Mac for Symfon2 development
I'm not going to bother the creation of a virtual directory con Apache that points
to your development folder.
So I'm simply going to copy my lion_test to /Library/WebServer/Documents/.
The run the following commands inside the directory
sudo chmod -R app/logs
sudo chmod -R app/cache
Now run http://localhost/lion_test/web/app_dev.php/people/ and you should access
the People List page.
Enjoy!!
| [1] | Install Apache and PHP on Mac OS X Lion (No XAMPP required) http://www.youtube.com/watch?v=iIZ1gfDjjL0 |
| [2] | Installation of MySQL server on Mac OS X Lion http://www.djangoapp.com/blog/2011/07/24/installation-of-mysql-server-on-mac-os-x-lion/ |
| [3] | Getting MySQL work on OSX 10.7 Lion http://stackoverflow.com/questions/6317614/getting-mysql-work-on-osx-10-7-lion |
| [4] | How to install MySQL 5.5 on Mac OS X 10.7 Lion http://blog.salientdigital.com/2011/09/08/how-to-install-mysql-5-5-on-mac-os-x-10-7-lion/ |
sábado, 24 de diciembre de 2011
Installing restructuredText Bundle for TextMate
I recently discovered restructuredText and got TextMate some time ago but haven't been able to play
with it. I'm trying to blog with it. So I looked up if there were any Bundles for TextMate (not that I'm that clear on what a bundle is).
Install Docutils
Download Docutils 0.8.1 .
On Terminal run:
sudo setup.py install
You will get a an output like this:
running installrunning build
running build_py
running build_scripts
running build_data
running install_lib
running install_scripts
changing mode of /usr/local/bin/rst2html.py to 755
changing mode of /usr/local/bin/rst2latex.py to 755
changing mode of /usr/local/bin/rst2man.py to 755
changing mode of /usr/local/bin/rst2odt.py to 755
changing mode of /usr/local/bin/rst2odt_prepstyles.py to 755
changing mode of /usr/local/bin/rst2pseudoxml.py to 755
changing mode of /usr/local/bin/rst2s5.py to 755
changing mode of /usr/local/bin/rst2xetex.py to 755
changing mode of /usr/local/bin/rst2xml.py to 755
changing mode of /usr/local/bin/rstpep2html.py to 755
running install_data
running install_egg_info
Removing /Library/Python/2.7/site-packages/docutils-0.8.1-py2.7.egg-info
Writing /Library/Python/2.7/site-packages/docutils-0.8.1-py2.7.egg-info
Install reStructuredText TextMate Bundle
Download the bundle in zip format from https://github.com/textmate/restructuredtext.tmbundle.
Unzip the file to a temporary location. In my case ~/Downloads/textmate-restructuredtext.tmbundle-edfe62e.
Edit the folder name from textmate-restructuredtext.tmbundle-edfe62e to textmate-restructuredtext.tmbundle using
Finder. The icon for the folder should change.
Open Terminal. Type the following commands:
mkdir -p ~/Library/ApplicationSupport/TextMate/Bundles
cp -r ~/Downloads/textmate-restructuredtext.tmbundle ~/Library/ApplicationSupport/TextMate/Bundles
Configure Environment Variables
I tried creating the variables using export but for some reason it didn't work. After doing some research
it seems there are several ways to declare environment list (using launchctl, using environment.plit and using export).
None of these methods worked for me on Lion, while trying to declare the TM_RST2HTML.
I kept getting the following error:
Couldn't find rst2html.py
You can either set the TM_RST2HTML variable to the full path of your docutils (docutils.sourceforge.net)        installation (e.g. /Library/Frameworks/Python.framework/Versions/2.4/bin/rst2html.py or set the PATH variable to include the path of the docutils converters.
Locations searched:
/Applications/TextMate.app/Contents/SharedSupport/Support/bin/CocoaDialog.app/Contents/MacOS
/usr/bin
/bin
/usr/sbin
/sbin
/usr/local2/bin
/Applications/TextMate.app/Contents/SharedSupport/Support/bin
What finally worked for me was opening TextMate and going to TextMate\Preferences on Advanced on Shell Variable
added to the PATH variable /usr/local/bin.
References
- TextMate reStructuredText Bundle
- http://xdissent.com/2009/02/28/textmate-restructuredtext-bundle/
- Quick reStructuredText
- http://docutils.sourceforge.net/docs/user/rst/quickref.html
martes, 9 de agosto de 2011
My First Symfony2 project with MS SQL Server 2008
A couple of days ago Symfony2 was finally released. I had been waiting for it because it promised to work with MS SQL Server 2008 via Doctrine2. I know what you're thinking why use SQL Server? Well let's just say that it's a job requirement.
This post attempts to replicate the example show on the Symfony site for Interactive Generators on Windows with a couple of twists. First I attempt to use MS SQL Server 2008 and add complex relationship between Posts and Tags as proposed on http://www.dobervich.com/2011/03/05/symfony2-blog-application-tutorial-part-ii-the-data-model/ .
Installation
I´ll be using Wamp 2.0 with PHP 5.3.6 (to learn how to configure PHP 5.3.6 with Wamp read http://markushedlund.com/dev-tech/install-php-5.3.3-on-wamp ) and MS SQL Server 2008 R2 (Express).
Download Simfony2.0.0 zip file.
Make sure php.exe is in your path variable.
Unzip the content of the zip file into your netbeans project directory (C:\NetbeansProjects for me).
Rename the Symfony directory to acme_blog.
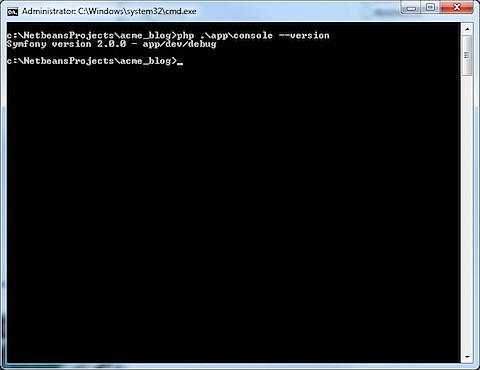
Open a command window and move to the acme_blog directory.
Run php .\app\console --version.
You should get the version of Symfony as shown:
Generating a Blog Bundle
On the command window run:
php .\app\console generate:bundle
Fill the data as follows:
Bundle namespace: Acme/BlogBundle
Bundle name[AcmeBlogBundle]:
Target directory [C:\NetbeansProjects\acme_blog/src]:
Configuration format (yml, xml, php, or annotation) [annotation]:
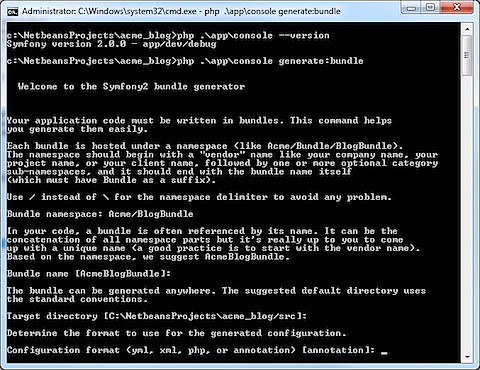
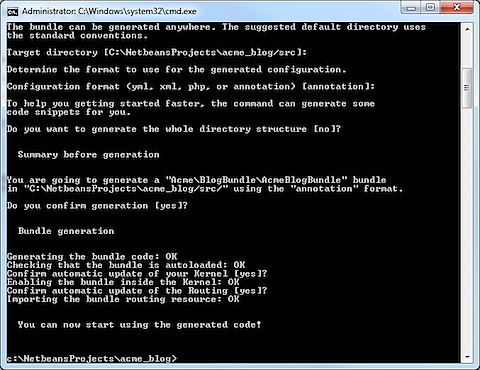
Do you want to generate the whole directory structure [no]?
Do you confirm generation [yes]?
Confirm automatic update of your Kernel [yes]?
Confirm automatic update of the Routing [yes]?
Opening the Project with Netbeans 7.0
Open Netbeans select File\New Project…
Select PHP Application with Existing Sources.
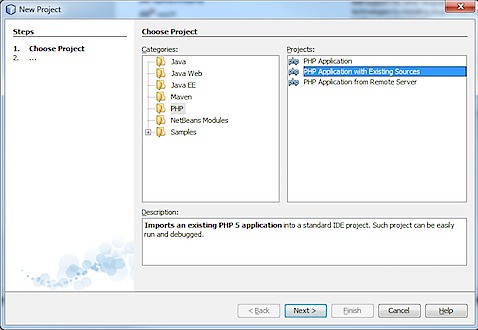
Click Next.
Select the source folder where you unzipped the Symfony framework.
Select PHP Version: 5.3
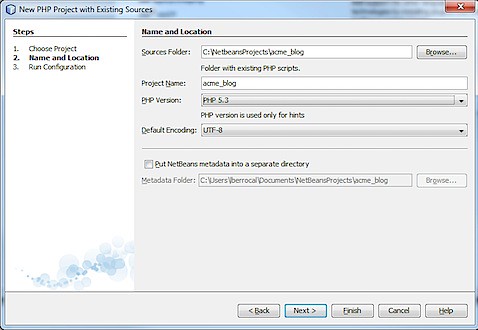
Click Next.
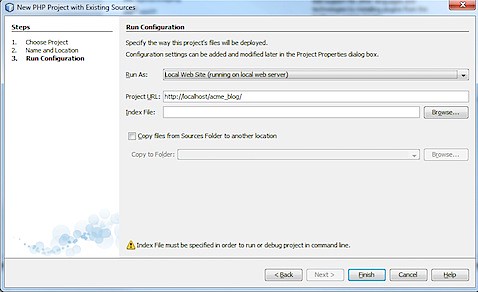
Click Next.
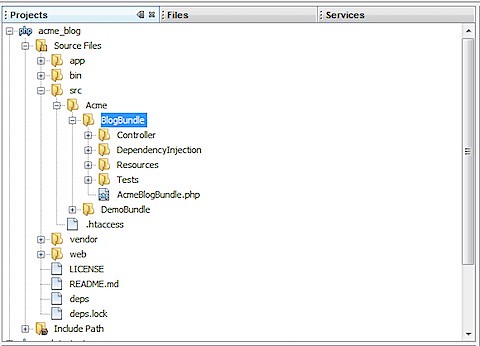
On the Projects tabe you should be able to see the BlogBundle.
Generating the Doctrine Entities
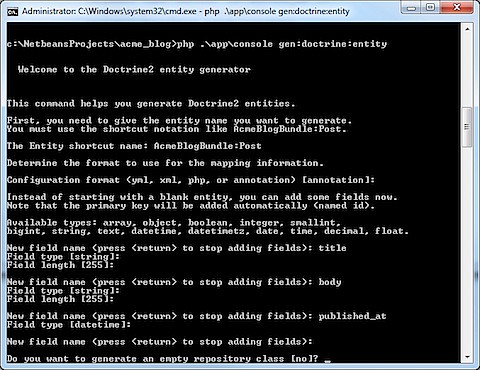
All the magic of Symfony 1.4.x where you created your schema con your schema.yml file and with a build --all command you would get your entities and database created for you are gone.
With Symfony 2 you use the gen:doctrine:entity command to dynamically create an entity.
Post Entity
We are going to create an entity name Post, that has three fields title (String (255)), body (String(255)) and published_at (datetime).
On a command window type:
php .\app\console gen:doctrine:entity
The Entity shortcut name: AcmeBlogBundle:Post
Add the three fields as shown:
Do you want to generate an empty repository class [no]?
Do you confirm generation [yes]?
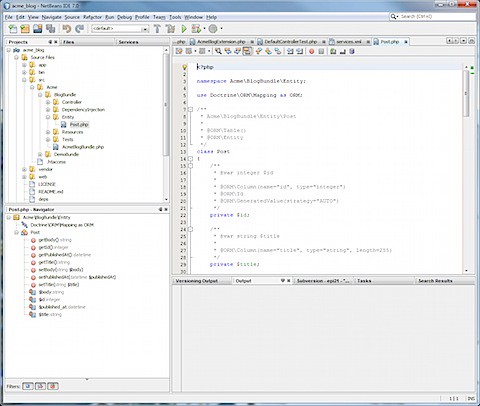
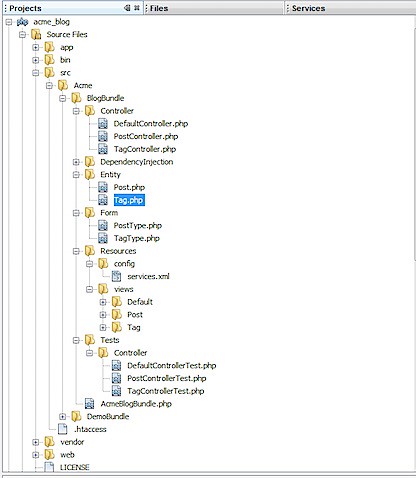
Look for the entity in your Netbeans Project under acme_blog\src\Acme\BlogBundle\Entity\Post.php
Tag Entity
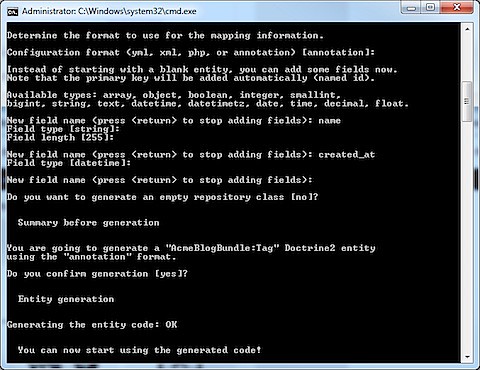
We are going to create an entity name Tag, that has two fields name (String (255)) and created_at (datetime).
On a command window type:
php .\app\console gen:doctrine:entity
The Entity shortcut name: AcmeBlogBundle:Tag
Add the two fields as shown:
Manually Create the Many to Many Relationship
Open the Post.php file and add the following code at the beginning
use Doctrine\Common\Collections\ArrayCollection;
Under the published at field add the following code:
/**
* @ORM\ManyToMany(targetEntity="Tag")
* @ORM\JoinTable(name="post_tag", joinColumns={@ORM\JoinColumn(name="post_id", referencedColumnName="id")}, inverseJoinColumns={@ORM\JoinColumn(name="tag_id", referencedColumnName="id")} )
* @var ArrayCollection $tags
*/
private $tags;
….
public function getTags(){
return $this->tags;
}
public function setTags($tags){
$this->tags =$tags;
}
Overriding the __ToString() function on Tags
public function __toString(){
return $this->name;
}
Create a Database
Start Wamp.
Create the Database Manually
Open Microsoft SQL Server Managemente Studio.
Right click con Databases and select New Database.
On the New Database window. Type acme_blog on the Database name and select sa as Owner.
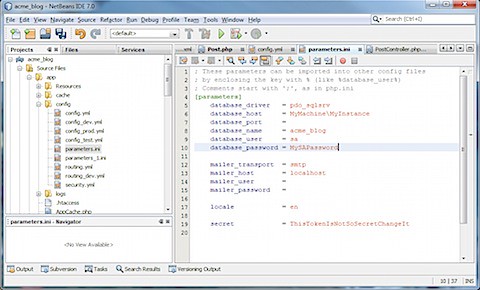
Edit the parameters.ini
Edit the Source Files\app\config\parameters.ini
Change the database_name to acme_blog, database_host to your instance, database_user to sa and database_password to your sa password.
On a command window type:
php .\app\console doctrine:schema:create
This will create the table Post, Tag and post_tag.
Generating CRUD Controllers and Templates
On a command window type:
php .\app\console doctrine:generate:crud
The Entity shortcut name: AcmeBlogBundle:Post
Do you want to generate the "write" actions [no]? y
Configuration format (yml, xml, php, or annotation) [annotation]:
Routes prefix [/post]:
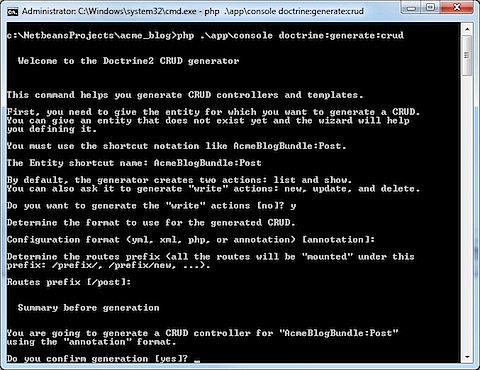
Do you confirm generation [yes]?
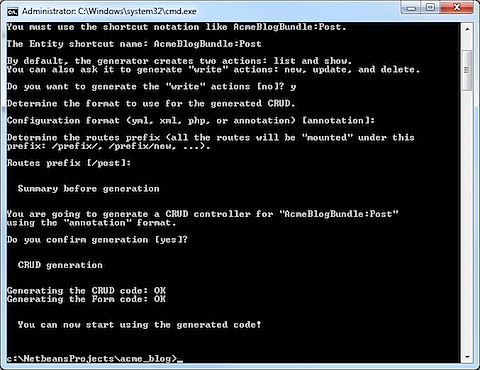
This action creates the Views and Forms as well as the entries in the PostController.
Repeat the process for the Tag entity.
Testing the Bundle
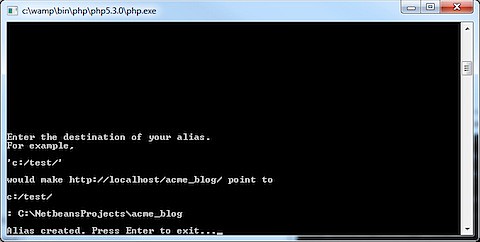
Click on the Wamp icon and click on Apache\Alias directories\Add an alias.
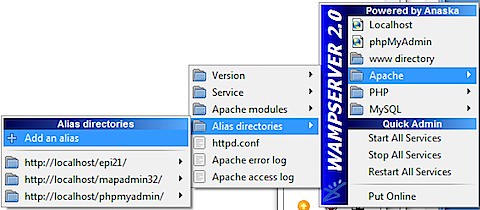
Use acme_blog as alias and point to C:\NetbeansProjects\acme_blog.
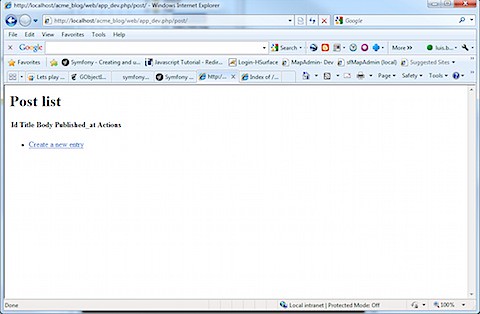
Access the url http://localhost/acme_blog/web/app_dev.php/post/. You should be able to add a Post.
Suscribirse a:
Entradas (Atom)